


Learn the process of setting up and overseeing hosting accounts for clients efficiently by using the user-friendly WebHost Manager dashboard, commonly referred to as WHM, in this guide.
This message is aimed at web developers who want to establish their own hosting services, whether for hosting websites and client accounts, or for those interested in understanding the technical aspects of website hosting. Learn how to efficiently set up, personalize, and oversee your hosting accounts using WHM.
The article demonstrates examples using a dedicated server from HostGator, with all screenshots taken from it. The examples can be applied on any service that offers WHM pre-installed and root access.
Shall we begin?
What does WHM stand for?
WebHost Manager, also called WHM, is a control tool essential for managing hosting servers. It offers a user-friendly interface to aid system administrators and hosting providers in efficiently managing dedicated servers or VPS.
The WHM enables the utilization of the well-known cPanel control panel, widely used in shared hosting settings. It serves as the main panel for cPanel, enabling the management of multiple separate cPanel accounts and configuration of various aspects on the server.
WHM primarily serves as a software layer enabling administrators to set up and oversee different elements of the hosting environment. Its main purpose is to streamline intricate tasks, automate procedures, and offer a wide range of tools to enhance server performance and user satisfaction.
Key features of WHM include hosting account management that can be accessed by third parties with varying permission levels, security settings, DNS management, backup processes, and more.
WHM provides a user-friendly interface with well-structured sections that enhance navigation through intuitive menus, making server management accessible to all users, regardless of expertise.
We will examine the precise procedures for setting up hosting accounts with this effective tool.
Requirements
Before delving into the setup procedures for hosting accounts in WHM, it is essential to understand the requirements for having the system in your hosting environment.
WHM is intended for use on dedicated servers, providing exclusive functionalities for individual users or entities. Dedicated servers offer enhanced resource control and are well-suited for organizations needing top performance and customization.
A common substitute for WHM setup is utilizing virtual private servers (VPS). VPS provides a dedicated share of resources on a shared physical server, offering a cost-effective and adaptable solution for businesses not in need of a full dedicated server.
Another option for using WHM is through hosting resale plans, which are offered by many companies. These plans typically include additional features such as customizing cPanel with the reseller’s branding and integrating the WHMCS billing module. This combination of WHM, WHMCS, and cPanel is ideal for those looking to start their own hosting company, as it includes a shopping cart for customers to select and purchase hosting plans. It’s important to note that for plans not involving hosting resale, a separate license for WHMCS must be obtained, such as for dedicated servers or non-resale VPS.
It can also be utilized in cloud hosting settings, although it is not a widely favored choice for this particular use.
Check out the discounted HostGator Dedicated Servers currently available.
Accessing WHM
Accessing WHM is the initial step in setting up and overseeing hosting accounts. For instance, HostGator includes WHM in its Dedicated Servers, VPS, and Hosting Resale plans, although resale plans may have certain restrictions on settings.
By using a service like the ones mentioned, you will get email access to WHM. It is important to have the right login details before following the steps outlined.
Access the WHM by typing the provided URL into your browser’s address bar, which could be similar to https://your-domain.com:2087 or https://server-IP-address:2087. Use the login credentials given by your hosting provider or system admin, and consider changing the password after your initial login for security. Opt for a robust password with a mix of letters, numbers, and special characters, totaling at least 10 characters.
After logging in, you will be taken to the primary WHM interface. For initial access, you may encounter screens prompting you to accept service terms. Simply agree to the terms and continue to the following step.
The layout is well-structured, with easily recognizable menus and sections. The side menu contains all WHM functions, which can be searched using a filter, facilitating navigation and access to tools for hosting account management and configuration.
The latest version of WHM’s homepage resembles this screen.
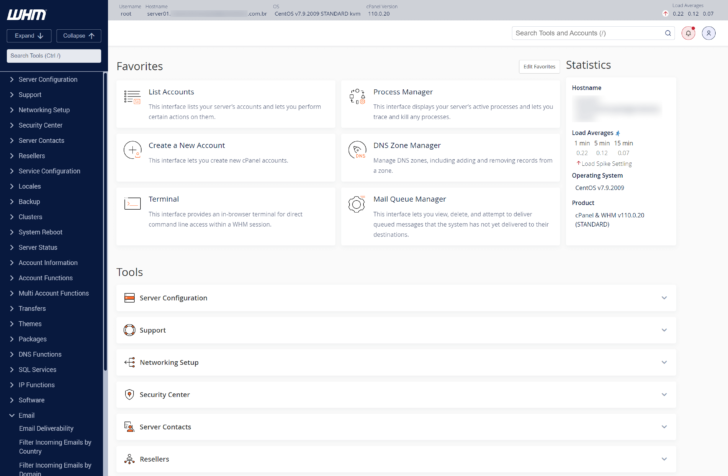
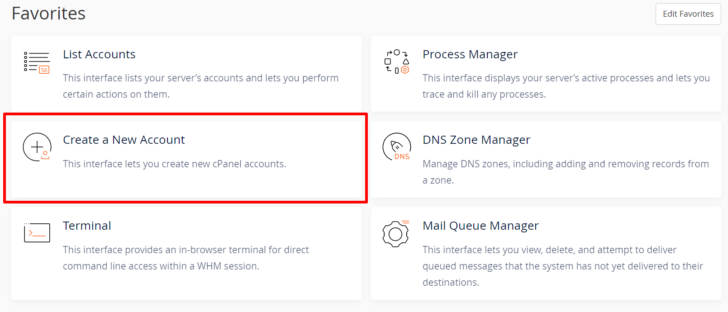
Some WHM sections, such as List Accounts and Create a New Account, are featured in the favorite area for easy access.
Developing hosting bundles
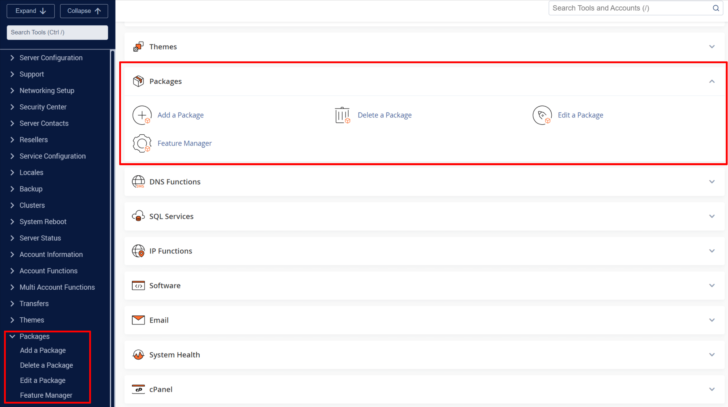
Prior to setting up the initial account, it is advisable to explore the Packages section, where the hosting packages are created by the reseller or system administrator. These packages establish limits and functionalities for the forthcoming hosting accounts. Resellers delineate diverse hosting plans for customer offerings, while agencies can tailor packages to suit various customer profiles based on their requirements.
To set up a hosting package, go to the Packages section on the homepage or side menu, and select the option to Add a Package.
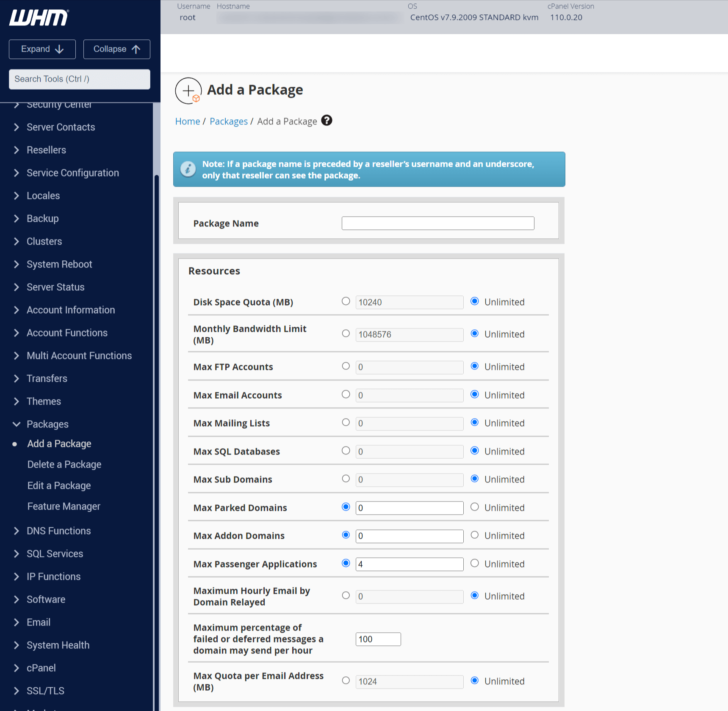
When creating package options, it’s important to assign a specific name. For example, if you intend to offer hosting services, consider using names like “Basic Plan” or “Superior Plan”. For agencies creating packages for clients, alternative naming conventions can be used. Ensure that the names and features of these packages are versatile and suitable for multiple situations or clients, as they will be accessible in the account setup section.
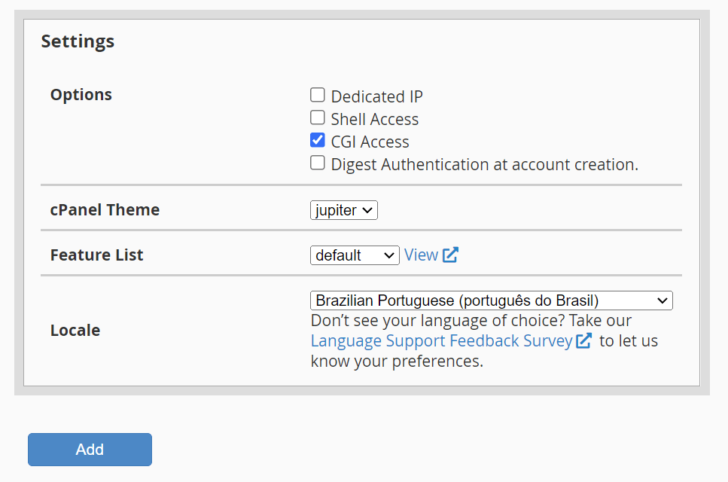
Here is where we specify the features and limits of the plan, including disk space, data transfer, email accounts, databases, extra domains, and more.
chsyys/KaboomPics
You can generate multiple hosting packages and then proceed to set up the hosting accounts accordingly.
In this instance, I will establish a Basic Plan 1 with a single domain and 1 GB of disk space (the amount should be specified in megabytes). It is important to note that packages can be adjusted by adding or removing features and changing their capabilities whenever needed. Nonetheless, the package name cannot be altered, so it is advisable to choose a name that will remain relevant.
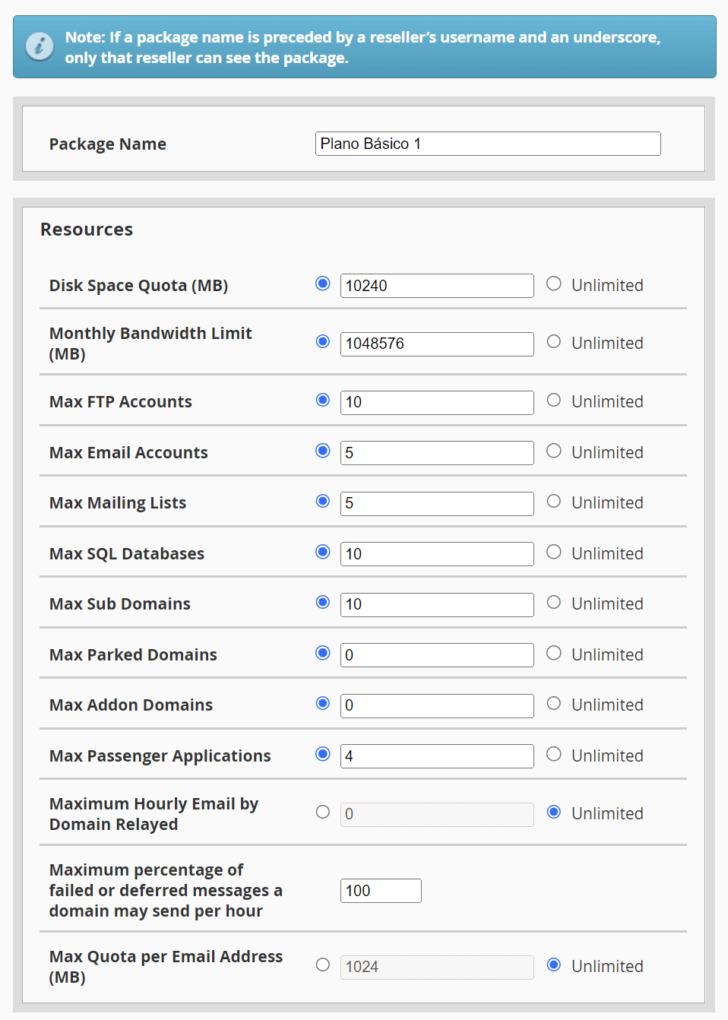
It is possible to specify additional features such as dedicated IP, Shell access (SSH), and language in the lower part of the package creation section. The language setting was switched to Brazilian Portuguese in this instance.
Setting up hosting accounts in WHM
After setting up the hosting packages, we can proceed to the New Account Creation section. Here, we will link a hosting account with one of the packages created earlier.
Fill out essential details for the new account, including domain name, username, password, and a cPanel administration email address on the account setup page. These details are compulsory, and you must also choose the hosting package previously created.
chsyys/Pexels
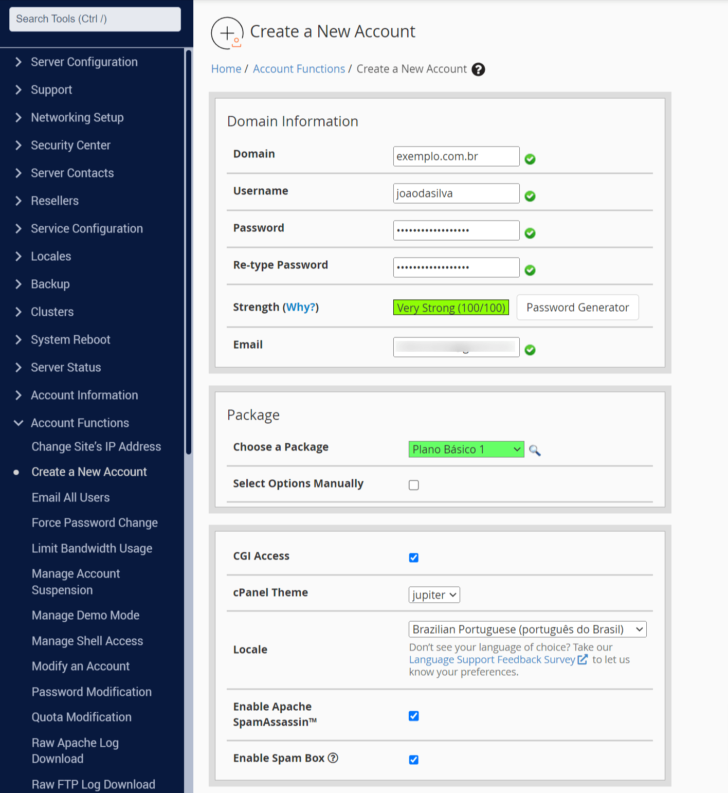
Other choices can be found on this page, including selecting a theme for cPanel and the installation language. Since we specified Portuguese as the language in the hosting package, this selection is already made when choosing the appropriate package.
Include additional options at the bottom of the page, such as email routing, the option to convert to a resale account, and DNS settings. These items can remain in the default selection when setting up new hosting accounts with separate cPanel instances. Refer to the official WHM documentation for account creation for further details.
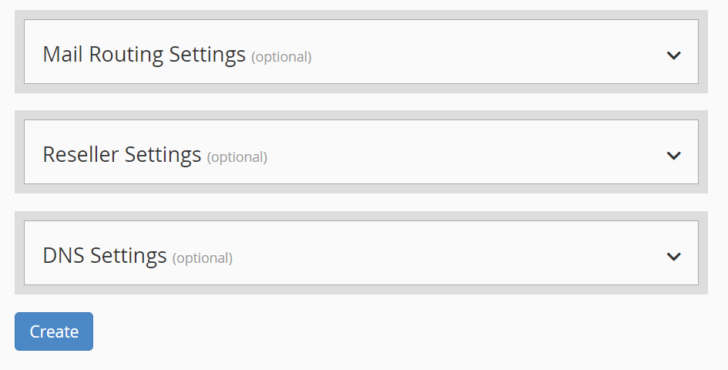
Click the Create button to initiate the hosting account setup process. The WHM will then show the scripts and their outputs on the screen, resembling a Shell terminal.
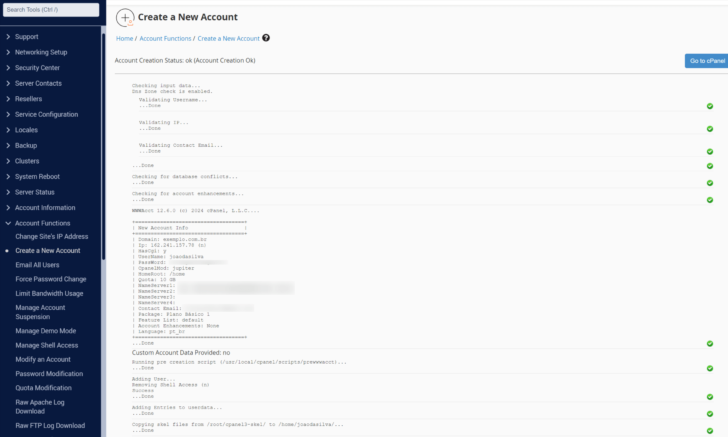
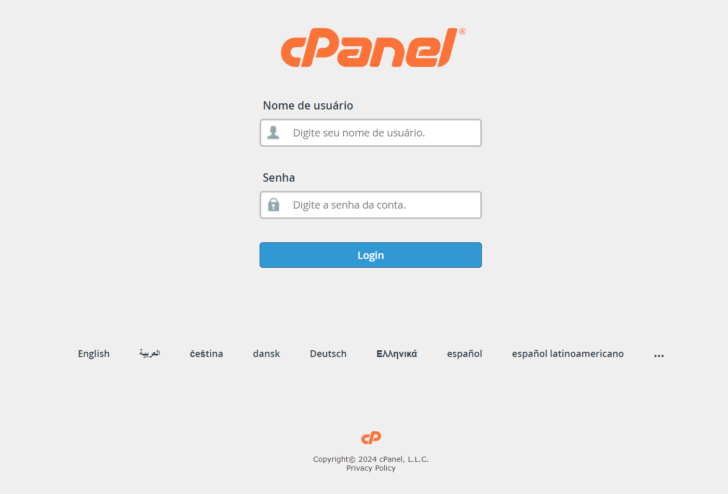
The WHM administrator’s email will be notified once the hosting account is created. The cPanel of the new hosting account can be accessed through the default address http://server-ip:2083, which can be shared with clients for exclusive access to the new cPanel account without WHM access, ideal for granting limited access to specific hosting accounts.
The appearance of the cPanel login screen resembles the image shown below.
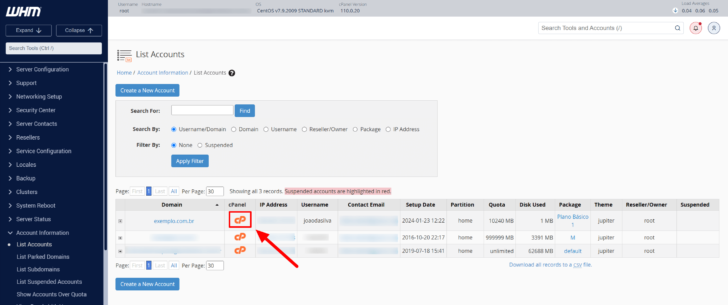
WHM administrators can view a list of accounts by selecting the List Accounts option on the WHM home screen. They can then click on the cPanel icon for the new account without requiring the new account’s password.
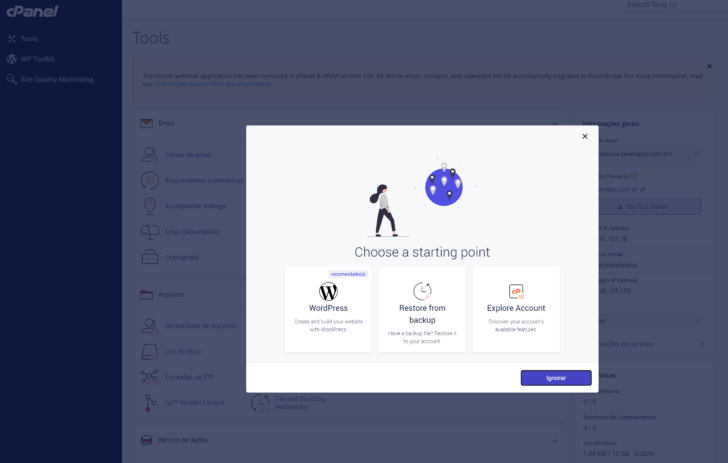
When first logging into cPanel, users are greeted with a welcome screen that includes quick links for actions like setting up a WordPress site, restoring backups (helpful for those switching from another cPanel hosting), and exploring account settings.
chsyys/GettyImages
chsyys/KaboomPics
Managing hosting accounts within WHM
Managing a hosting account in WHM is crucial for ensuring a well-organized, secure, and stable server environment.
WHM offers convenient actions for managing hosting accounts on the account list page. Access the page to see the list of accounts and use the “+” icon for quick account management options.
- Change in cPanel user password.
- cPanel administrator email modification.
- Account suspension.
The account can be suspended for various reasons, including non-payment, service abuse, project interruption, among others. Suspending the account does not delete any data, it only restricts access to the site and cPanel.
Other choices are available.
- Only change the IP address if you have a designated IP for the account.
- Modify partition or disk partition alteration involves changing the location of the user directory on the disk.
- Disk space modification / Quota adjustment.
- Upgrade or downgrade plans by changing the plan selection.
- Modify Account to make alterations to the account.
- Deactivate Account: To permanently delete the server account.
chsyys/KaboomPics

This outlines the fast tasks that can be done within the hosting accounts list in WHM, with additional bulk management choices found in other WHM areas.
Maintaining hosting accounts in WHM: Best practices
Implementing good practices and following specific tips are essential for ensuring the efficiency, safety, and reliability of the hosting environment in WHM. Let’s explore some steps that can be taken to maintain WHM and hosting accounts effectively.
Make sure to regularly update WHM to receive security enhancements, performance upgrades, and new features. Stay informed about the latest versions and apply updates when necessary, either automatically or manually.
Set up routine backups for each hosting account to guarantee access to up-to-date backups in the event of data failures or losses. Consider transferring WHM backups to an external server if feasible. Detailed instructions can be found in the official WHM documentation.
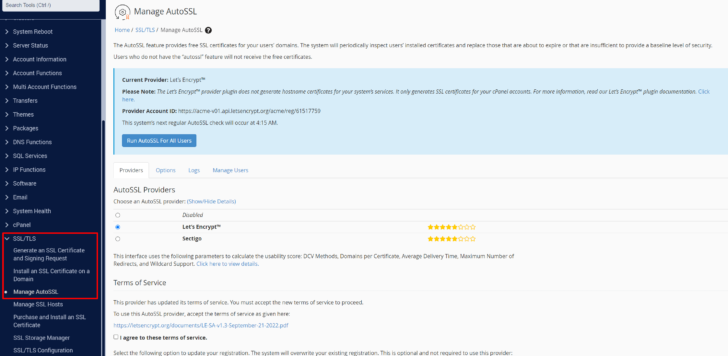
Implementing SSL certificates for all hosting accounts ensures secure data transmissions, boosts user confidence, and enhances SEO. WHM comes with Let’s Encrypt integration, a trusted and cost-free certification authority. Simplified SSL certificate deployment and oversight can be done automatically through the SSL/TLS -> Manage AutoSSL feature. Additionally, a script can be executed to generate SSL certificates for all domains within WHM, provided they are using the server’s designated DNS servers.
Utilize monitoring tools to observe server resource usage, pinpoint performance bottlenecks, and predict issues before impacting end users. The Server Status tab offers features for monitoring Apache status, daily logs, server details, and service status. Regularly checking system logs can help in detecting unusual trends and possible issues.
The WHM Software section offers a variety of tools for adding software and modules that can be crucial in different scenarios. It includes options for installing and managing Apache and NGINX web servers, updating WHM, changing PHP versions, and adding Nodejs, a Python server, and other extensions. Consult the WHM documentation for more details on adding these tools.
Conclusion
In this article, we discuss how to set up accounts and hosting packages in the WHM/cPanel interface. It is crucial to uphold a secure and reliable hosting environment regardless of its intended use. Employing SSL certificates and regular monitoring are key practices to safeguard data integrity and prevent incidents.
Throughout the text, we utilize a specialized HostGator server for the demonstrations provided.
Consider utilizing a dedicated server or VPS if you plan to employ a service that uses the WHM panel, as shared hosting options do not offer access to WHM but only to a version of cPanel or another control panel.
I suggest referring to our top VPS server rankings and best dedicated server list, which is regularly updated with various service providers.
Please get in touch with us if you need assistance, and I will strive to support you.
Publication date: January 29, 2024
Tags: Equipment, Guides