
WooCommerce is the top choice for setting up online stores with WordPress, providing a flexible and customizable solution for various business needs.
We will cover everything from the fundamentals to the initial setup in this tutorial, enabling you to establish a complete virtual store quickly. The tutorial will guide you through installing and setting up WooCommerce, uploading products, customizing the store’s appearance, and enabling payment options for an optimal shopping experience for your customers.
Regardless of whether you are experienced in web development or e-commerce, this tutorial is made to be simple and easy to understand.
What is WooCommerce is inquired about.
WooCommerce is a plugin for WordPress, which is a widely used content management system for creating various types of websites, including online stores.
WooCommerce, as a plugin, easily connects with the WordPress system, utilizing its functions like creating pages, managing users, and optimizing for search engines. This versatility makes WooCommerce a favored option for online stores of various scales, ranging from small enterprises to large corporations.
Users can conveniently incorporate products, configure payment and shipping preferences, oversee stock levels, assess sales data, and perform various tasks using WooCommerce’s user-friendly interface. Moreover, WooCommerce provides a diverse selection of extensions and themes to tailor and enhance store capabilities based on individual business requirements.
Creating an online store using WordPress WooCommerce
Installing and setting up WordPress and WooCommerce is not complicated, thanks to hosting companies providing automatic installers. This allows website owners to focus on customizing their online store without having to deal with technical issues.
We will be using HostGator services in this tutorial, which provides affordable WordPress hosting with automatic installation and setup tools. Let’s get started.
Hosting and registering a domain
To set up a WooCommerce online store, the initial step involves selecting a hosting service and acquiring a domain name. While we utilized HostGator for our store setup, other hosting providers can also be used. Note that the installation and setup processes may vary across different hosting platforms.
HostGator provides three shared hosting options for WordPress websites. We have chosen the Turbo plan for our virtual store, anticipating growth in traffic and sales due to its superior features and performance compared to other shared hosting plans. It is important to note that the other plans also support WordPress with WooCommerce, but an upgrade may be required in the future depending on the store’s success.

chsyys/Pexels
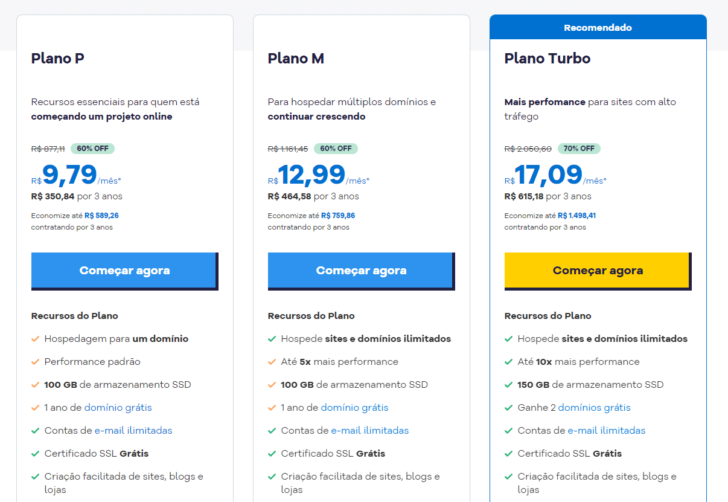
To access the service, click the “start now” button on the selected plan. On the next screen, you will see different payment cycle options such as monthly, semester, annual, or triennial. Opting for a longer payment cycle results in a lower cost compared to the monthly plan. For instance, in the triennial cycle, the Turbo plan costs the equivalent of R$17.09 per month in this promotion, while the monthly plan is priced at R$62.87/month without any discount. It’s important to note that payment for the chosen cycle must be made upfront. Therefore, if you choose the triennial option, the plan will only be renewed after 3 years. This is a beneficial way to save money in the long term and ensure your store remains operational for an extended period without any concerns.

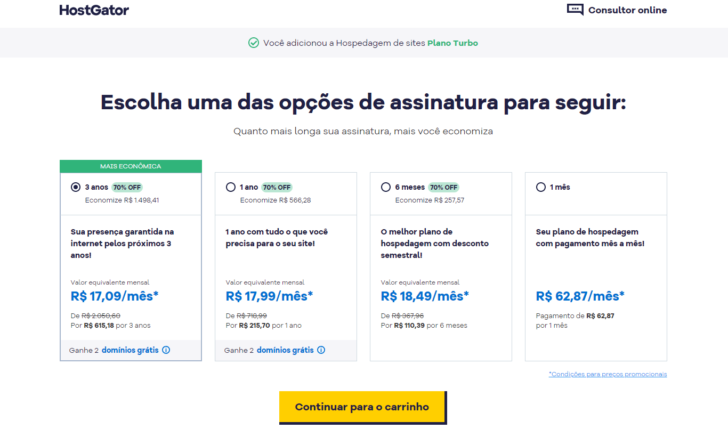
Annual and triennial cycles offer the registration of two domains for free for one year, with renewal required on an annual basis like any other domain registration.
After choosing the payment cycle, we can move on to the shopping cart where you have the option to register a domain for free with the annual or triennial cycle. Simply search for the domain availability in the designated field.

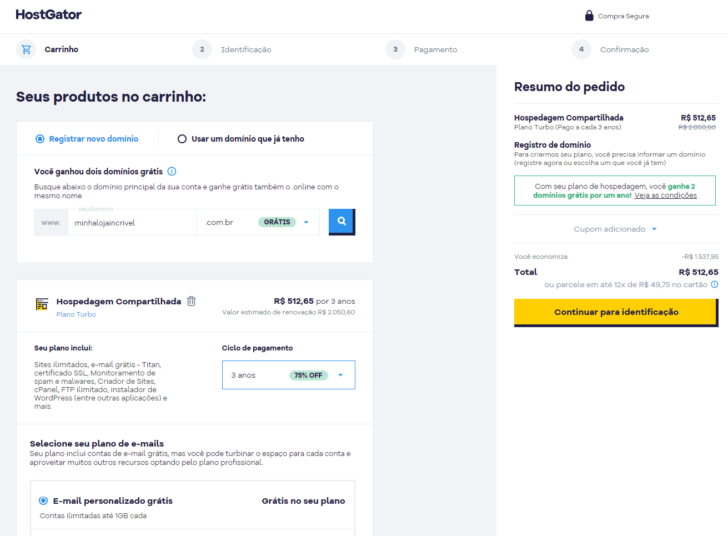
HostGator plans provide unlimited email accounts, each with 1 GB storage space, which is another noteworthy feature.
After selecting the domain, click on the “Proceed to Identification” button and complete the form with either your personal information or that of your company. A customer account will then be set up for you by HostGator.
Refer also to: tips for designing a sales landing page
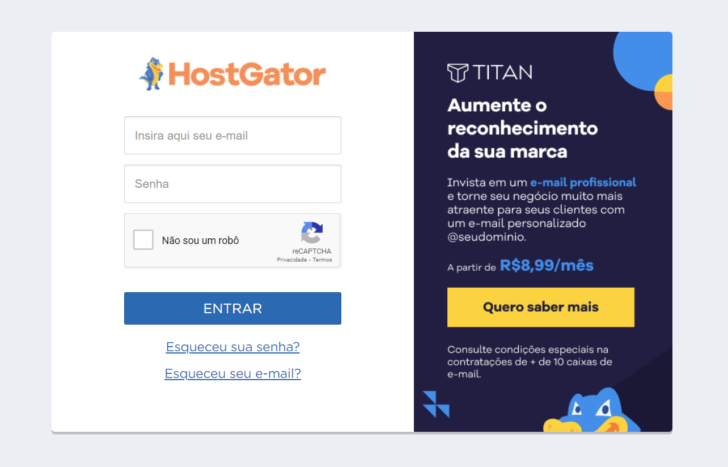
Store the login information securely, including the email used for registration and your chosen password. After completing the payment, you can access the customer dashboard. Remember that service activation for credit card payments takes a few minutes, while for boleto payments, you’ll need to wait for processing. To log in to the HostGator client panel, visit https://cliente.page.hostgator.com.br/ and enter your login credentials.

Setting up WordPress and configuring it initially
If you registered the domain through the HostGator shopping cart, the DNS pointing will be done automatically to their servers. If not, you will need to manually point the domain to the hosting server. If you have any questions about this process, you can seek assistance from the hosting company’s support team.
To install WordPress, access the hosting panel on HostGator, find your registered domain under the “Sites” tab, and click the “cPanel” button.


You will be guided to cPanel, an interface that efficiently manages your hosting and offers various functions, including the WordPress installer via the Softaculous application. Setting up WordPress through Softaculous on cPanel is quick and straightforward. The same steps can be followed if you have a different hosting provider that utilizes cPanel.
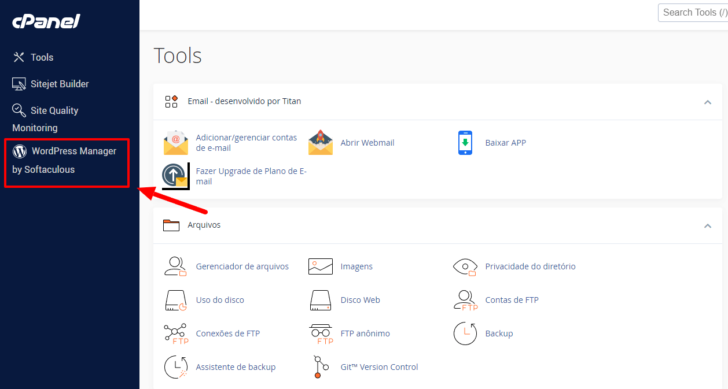
In the cPanel, find the “WordPress Manager by Softaculous” option in the side menu. If you can’t see this link, just scroll down to find the auto installer.

chsyys/UnPlash
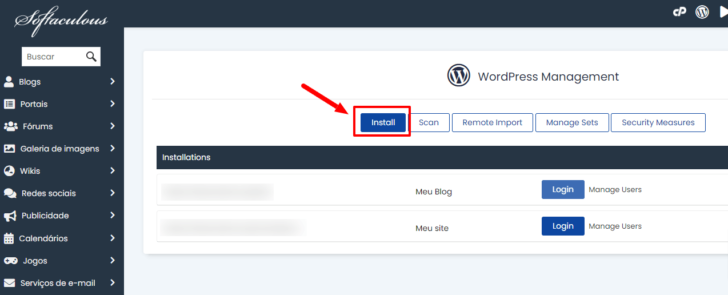
The WordPress management screen on the Softaculous interface should be visible. To initiate a new WordPress installation, simply click the “Install” button located at the top of the page.

The installation form will show up next, requiring details like the domain for WordPress, the site name (or online store), an admin login and password, installation language, and more. Opt for the latest WordPress version for updated features and enhanced security.

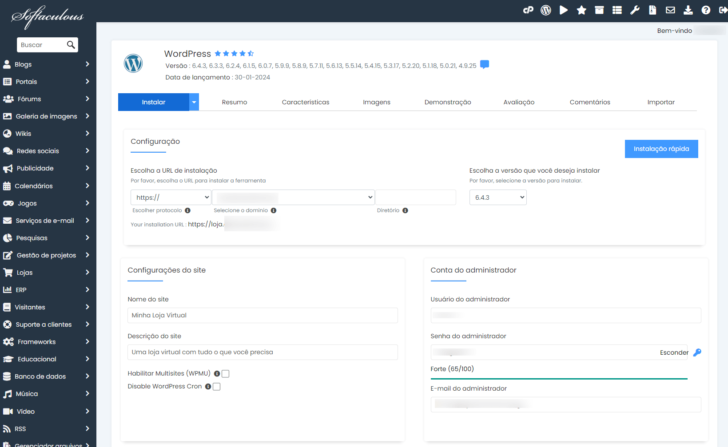
Softaculous offers the option to select and install plugins and themes during setup, including WooCommerce. This choice also includes additional features like Post Office freight calculation, Google Analytics integration, payment modules, and Brazilian market adaptation.

chsyys/StockVault
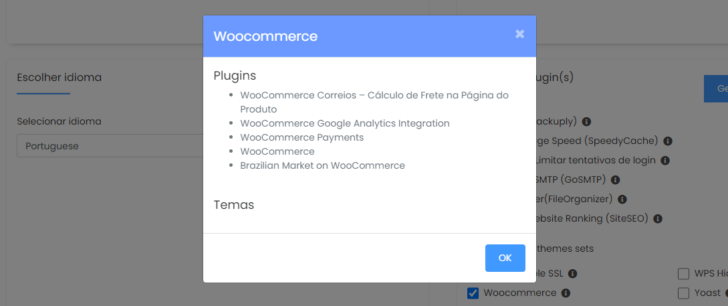
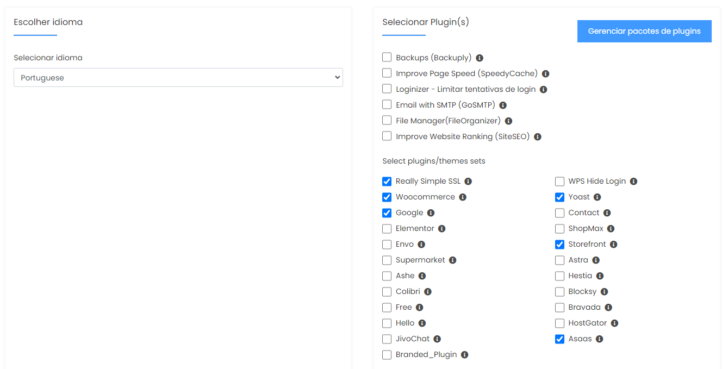
Another alternative for setting up a WooCommerce WordPress store is to choose a WooCommerce-compatible theme. Softaculous provides several options for this purpose. I will opt for the Storefront theme and install plugins like Really Simple SSL, Yoast SEO, Google SiteKit, and Asaas, a Brazilian payment gateway tailored to our market, enabling payment acceptance through Pix, boleto, and credit cards.
My theme selection screen and plugins appeared in this way:

chsyys/UnPlash
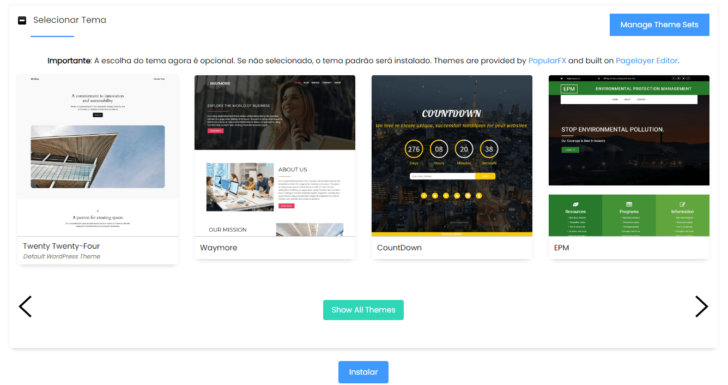
You can choose a theme from a gallery further down the page, but since I already picked Storefront earlier, I will skip this step and simply click the “Install” button at the bottom of the page to complete the process.

The process of setting up WordPress, including plugins and settings, will begin shortly and may take a few minutes. It typically completes quickly, so please avoid closing the browser window or navigating to a different page during this time.


chsyys/FreeImages
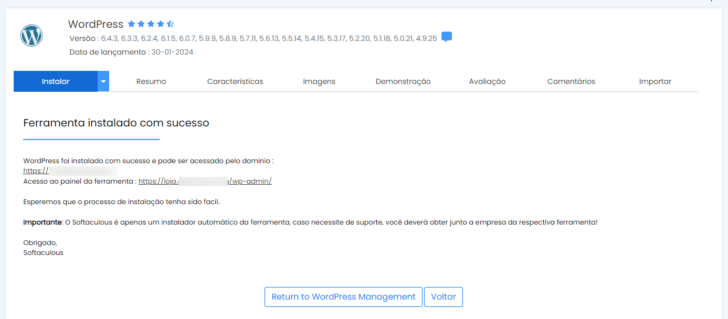
After completing these instructions, WordPress will be automatically installed on your hosting using Softaculous on cPanel. You can then customize it for your website or online store, and the link to access the WordPress panel will be provided on the screen.

Initial configurations in the WordPress control panel
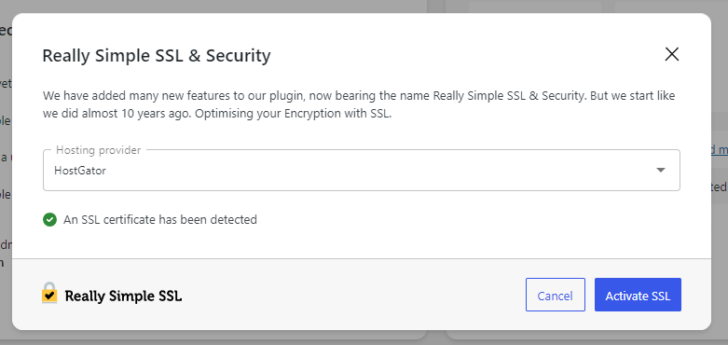
Upon initial access to the WordPress panel, certain configurations are necessary, particularly if themes and plugins were chosen in Softaculous beforehand. Upon my first login, I encountered the Really Simple SSL plugin, which promptly identified the existing SSL certificate provided by HostGator after the domain setup. It was a simple process to enable SSL on WordPress, ensuring that all visitors to my online store will utilize the secure HTTPS protocol for encrypted communication between server and client, enhancing website security.

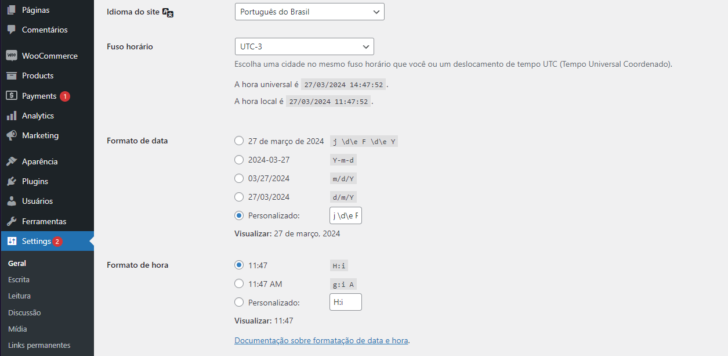
After completing this task, it is advisable to check and adjust certain WordPress preferences. My setup initially used the Portuguese language from Portugal. To make adjustments, including changing the language, configuring the time zone, and adjusting date and time formats, navigate to the Settings -> General section in the sidebar menu. Simply update the details as needed and save the modifications.

Check for any necessary updates by accessing the Updates option in the menu.
Installation of WooCommerce
If you didn’t use Softaculous to install WooCommerce, you can manually install it through the WordPress panel.
To do this, access the administrative section of your WordPress website by entering your site’s address followed by /wp-admin in the browser (e.g. www.yoursite.com/wp-admin) and log in with your credentials.
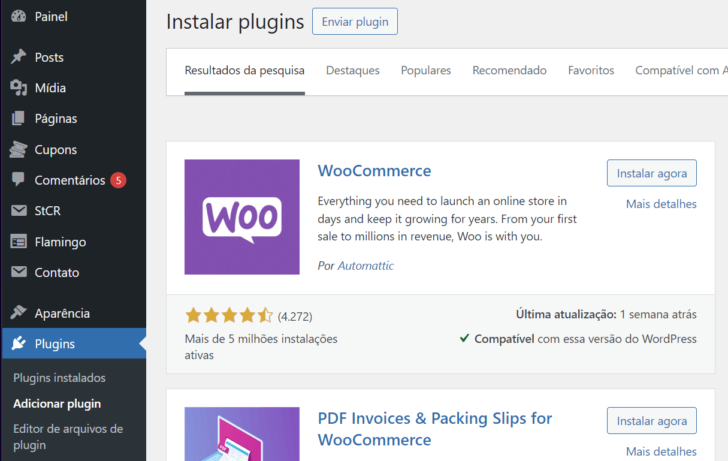
After logging in, you will be taken to the WordPress admin panel. Navigate to the “Plugins” section in the left menu and select “Add New”.
On the “Add new plugin” page, you can use the search bar to find the WooCommerce plugin by typing its name and hitting “Enter”. Once the WooCommerce plugin shows up in the search results, click on the “Install Now” button to have WordPress automatically download and install it.

chsyys/Pexels
After the installation is finished, the “Install Now” button will change to an “Enable” button. Select the “Enable” button to activate the WooCommerce plugin on your WordPress site.
After enabling the plugin, WordPress may show a notification asking you to begin the initial setup of WooCommerce, which brings us to the following subject.
Configuring a virtual store on WooCommerce.
After you add WooCommerce to your WordPress website, it’s important to follow some essential setup procedures to establish your online store and begin selling items. It is advisable to utilize the WooCommerce setup wizard before moving on to more complex configurations. To access this, click on the WooCommerce option in the side menu of your WordPress dashboard.

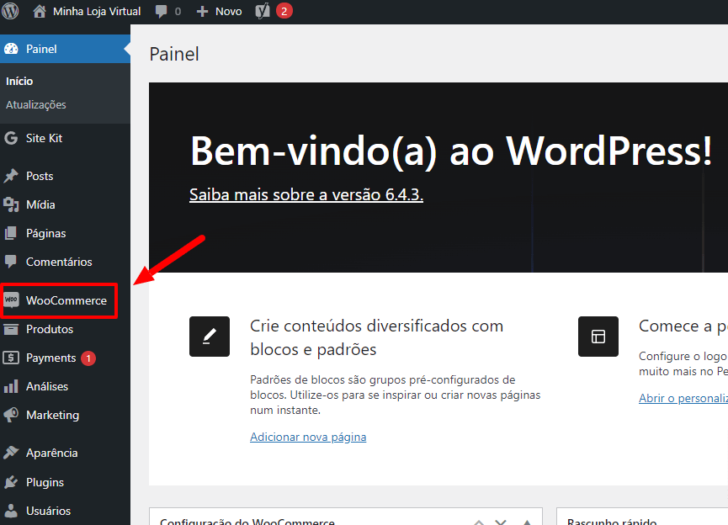
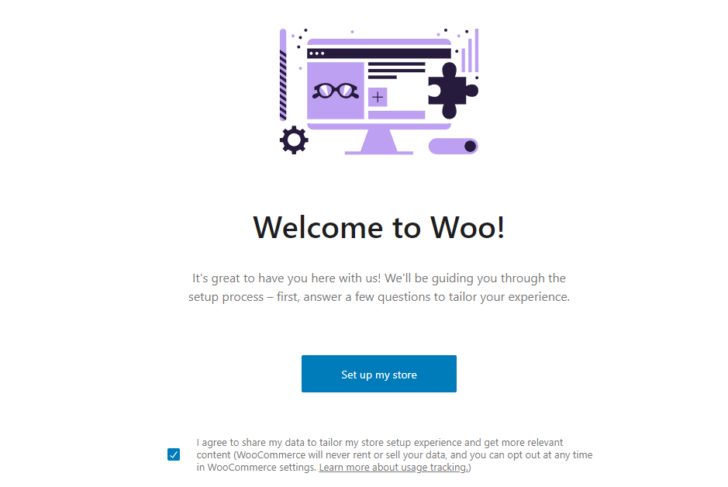
The first WooCommerce setup wizard will appear, helping you with essential store settings like currency, location, payment options, and shipping. Simply click “Set up my store” and proceed with the wizard’s instructions.

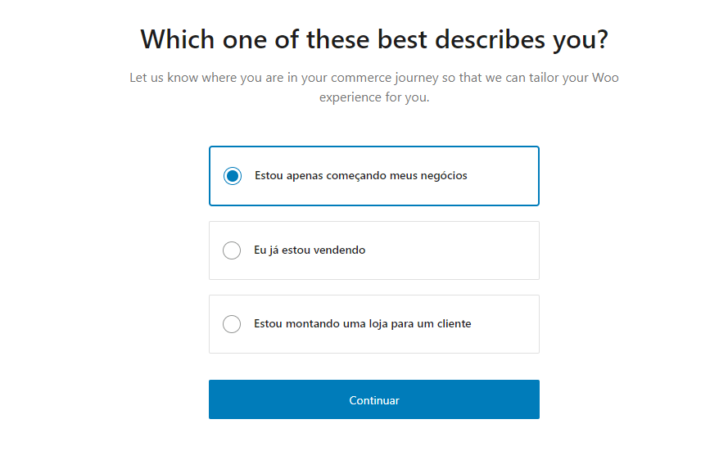
Choose the “I’m just beginning my business” option if you are setting up your own store.

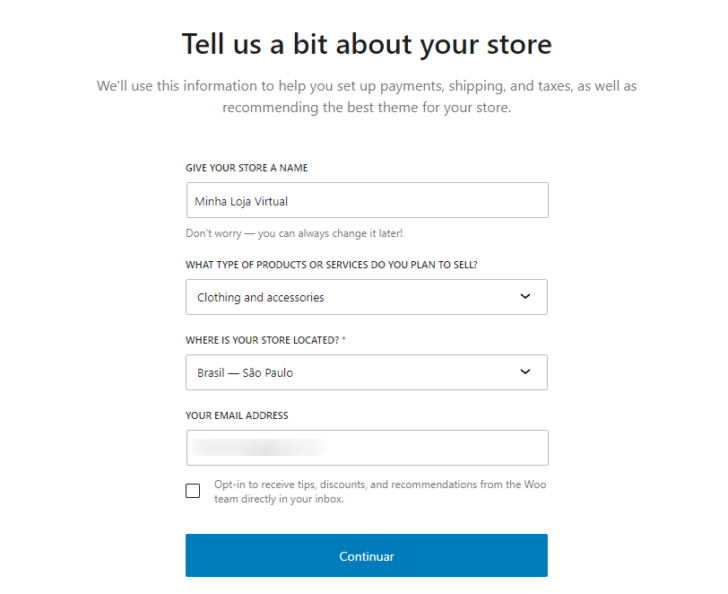
The wizard will ask for details about your business sector. Respond to the questions as you like and proceed.

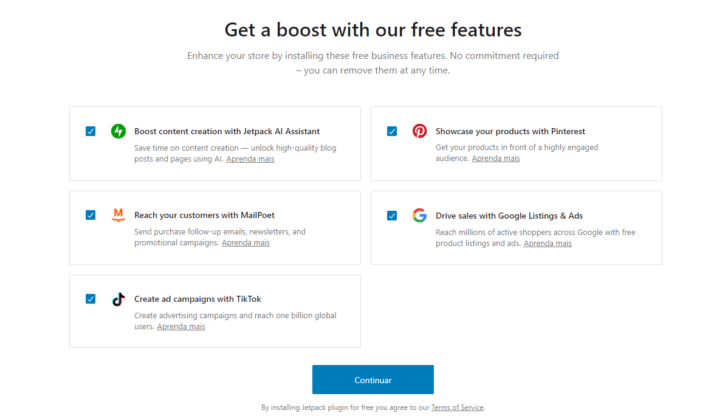
During the wizard setup process, you can choose or remove various extension options as needed.

Finally, the wizard will show a concluding screen.

The wizard will guide the user back to the WordPress admin panel, where a new set of instructions will be shown for configuring product insertion, theme selection, payment settings, and other options.

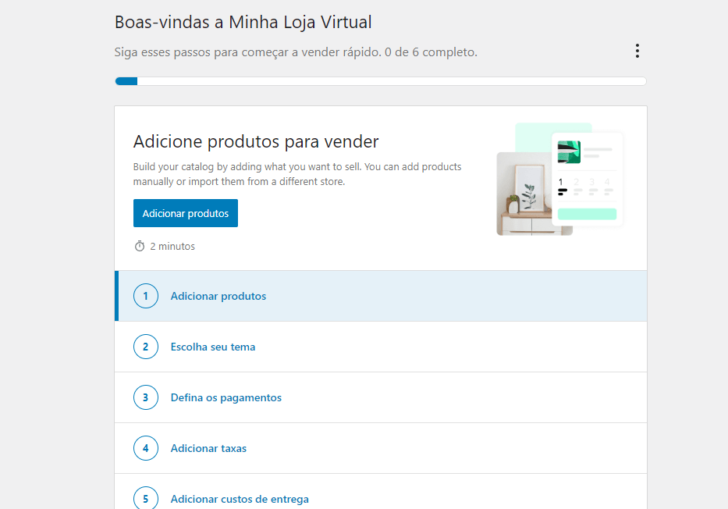
The wizard does not have to be followed in sequential order as selecting an item directs the user to the corresponding section in the admin panel.
Before making more complex configurations, I will import a large number of products to get an idea of how the store will look once it is stocked with items for sale.
Bulk uploading products in WooCommerce
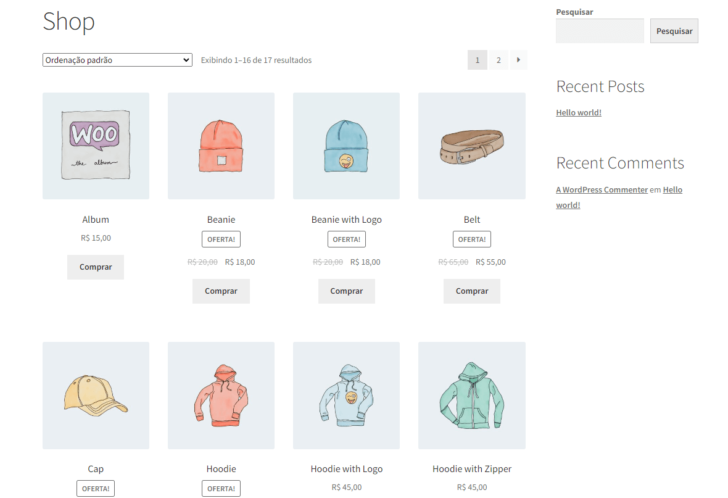
Shortly after setting up WooCommerce, when the admin goes to the store’s homepage, they will encounter a blank and unattractive page. However, WooCommerce offers preset files for bulk uploading fake products as a way to preview product display and test different themes before making a final decision.
To do this, you need to install the WooCommerce plugin, extract the files, and locate a folder named sample-data. Within this folder, you will find the sample_products file in both csv and xml formats, which can both be used for importing.
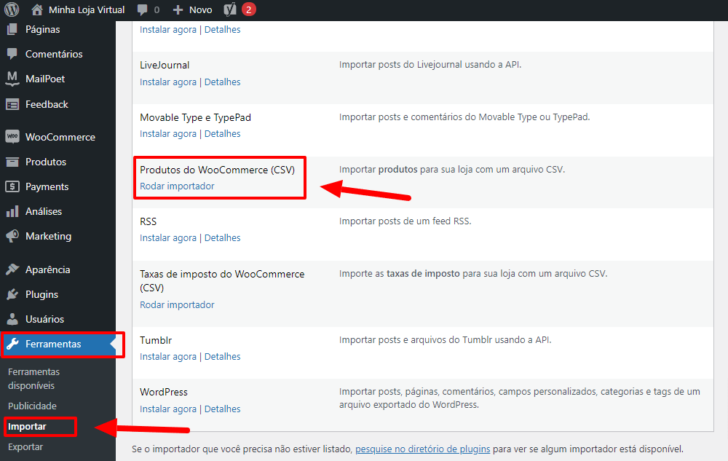
Locate the “Tools” -> “Import” option in the menu, select “WoCommerce Products,” and click on “Run importer” after having the file ready.

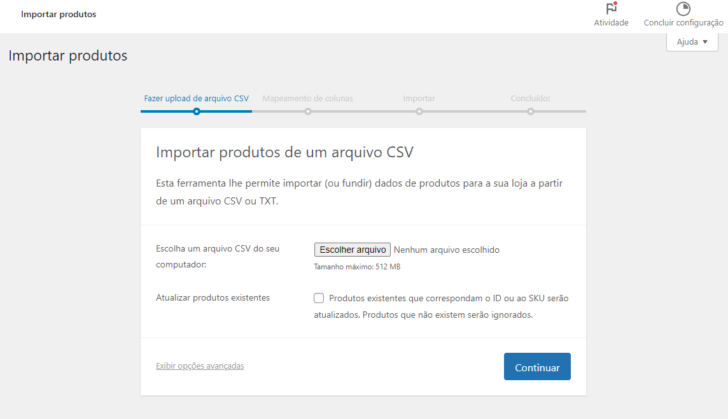
Click on “Select File” on the import screen, then find the sample_products.csv file saved on your computer. Finally, click on “Continue”.

A screen for mapping columns will show up, allowing you to upload multiple files of your products in .csv or .xml formats. You can specify the content of each piece of information in the file, starting with the first line. This feature is quite handy, right?

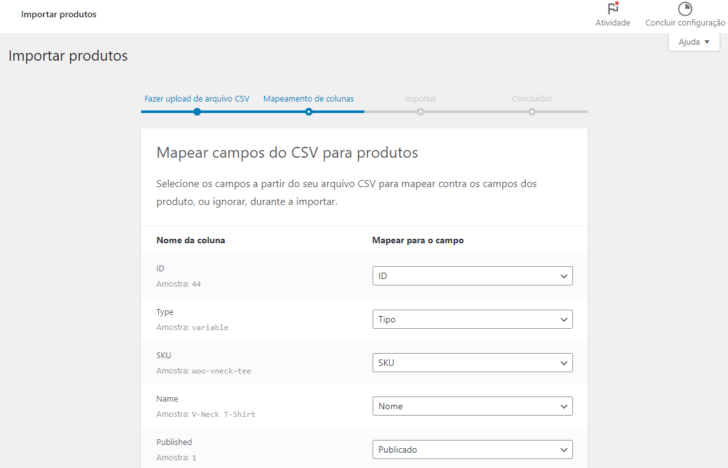
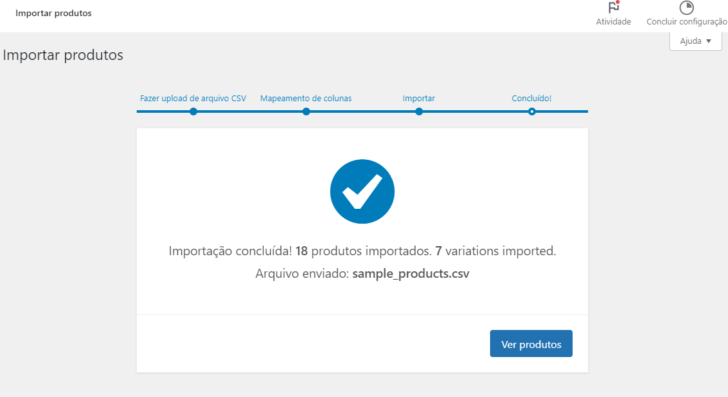
Click the button to begin the import process after verifying the data. The duration of the process will vary based on the number of items in the file, and a success screen will appear upon completion.

If you go to the typical URL example.com/shop, you will encounter a page filled with products, making it more convenient to begin personalizing the store in my opinion.

WooCommerce’s basic configurations
Before inserting your products, it is beneficial to configure some fundamental settings in your WooCommerce WordPress store.
In the WordPress dashboard, navigate to WooCommerce -> Settings, where you can access tabs to configure different store elements.
- Main store settings include address, currency, country, and unit of measurement, among other options.
- Product-related settings like page templates, dimensions, and reviews are included in the products section.
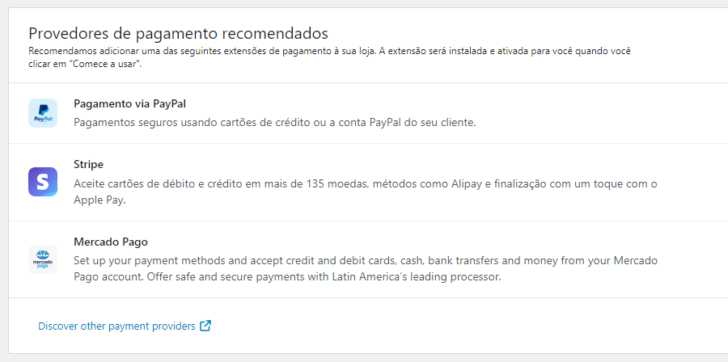
- Checkout choices include payment methods, shipping options, and customer account settings. Paying close attention to this stage is crucial for configuring payment methods that will be utilized effectively in the store.
- Settings concerning customer accounts, privacy, and email notifications.
- Customizing and setting up emails sent by the store, like order confirmations and delivery notifications.
- Advanced features include REST API, migration tools, and webhooks configuration options.

The “Campos do Checkout” segment was developed by Brazilian developer Claudio Sanches, known for creating the Brazilian Market on WooCommerce plugin. This feature enables customization of the shopping cart specifically for the Brazilian market, offering various options such as validating customer CPF or CNPJ, specifying sales for individuals and/or legal entities only, and renaming the phone field to “cell”, among other choices.

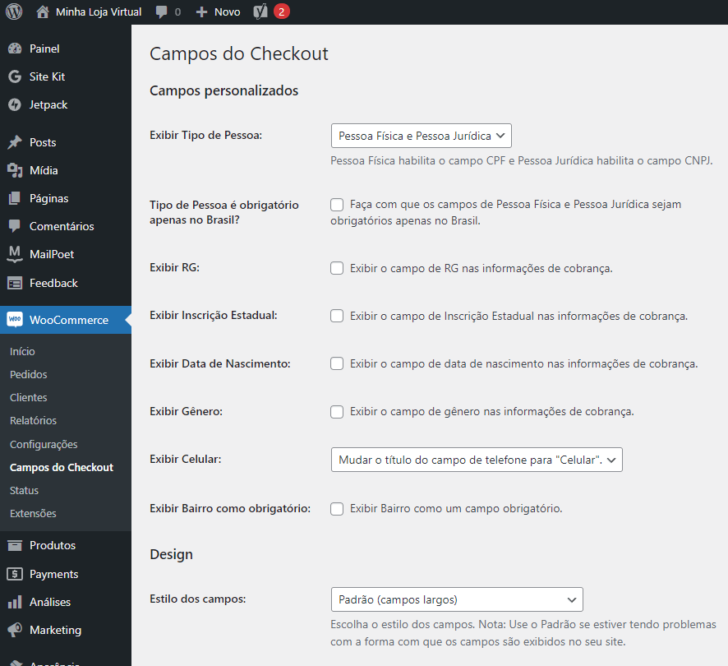
As a store owner, it is crucial to check and adjust the settings for all products in WooCommerce to enhance customer experience and ensure successful sales. Keep in mind that the initial setup is only the starting point, and you can make further enhancements to meet your business requirements.
Customizing WooCommerce (themes and plugins)
WooCommerce provides numerous choices for adjusting your e-commerce store’s design, enabling you to tailor the layout to match your brand image and offer a distinctive shopping journey for your clients.
Choosing an appropriate WooCommerce theme is a practical method to customize your store layout. Various WordPress themes are compatible with WooCommerce, including both free and premium options. These themes provide ready-made designs that can be easily adjusted using the WordPress theme customizer or theme-specific settings.
In the WordPress theme repository, there are numerous free e-commerce themes available. Paid themes are typically bought through marketplaces like TemplateMonster, allowing you to select a theme and make a one-time payment for its use without ongoing fees.

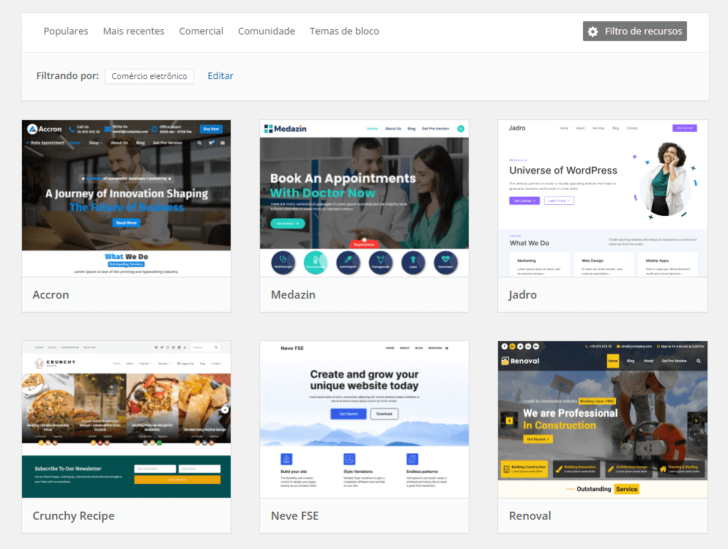
You can customize your store layout beyond selecting a premade theme by modifying the theme code or utilizing customization plugins. This allows you to adjust colors, fonts, spacing, element positioning, and other aspects to match your brand’s visual identity.
WooCommerce offers widgets for placement in different sections of your website, such as sidebars and footers. Widgets can showcase product categories, featured products, shopping carts, and more, enhancing customer navigation and site organization. Widget placement and customization may vary depending on the theme, so it’s important to review theme specifications when selecting one.
Each item and section in WooCommerce includes unique pages that can be tailored to showcase specific details based on your preferences. These pages allow you to include in-depth descriptions, photos, videos, customer feedback, and other elements to promote your products effectively and drive sales. Previewing available page templates within themes simplifies the selection process.
There are numerous plugins for WooCommerce that provide extra features and advanced customization options, such as product gallery, product comparison, and image zoom plugins, to enhance user experience and personalize store layout. If a desired feature is missing in the current theme, it can often be added using plugins.
Next actions for your online shop using WooCommerce
After setting up and starting your online store, there are further actions the store administrator can do to enhance and grow the business.
Updating your website regularly, including WordPress, WooCommerce, and plugins, helps safeguard your store against security risks and allows you to benefit from the newest enhancements and features.
Monitoring your store’s performance using analytics tools can help pinpoint areas for enhancement and potential growth opportunities by tracking metrics such as traffic, conversion rate, sales, and popular products.
It is crucial to implement a productive customer service system to handle inquiries, grievances, and uncertainties from the public.
Marketing tactics are essential for promoting your store and attracting customers, just like in any business. These strategies may involve content marketing, social media, email marketing, paid advertising, and other methods to boost your brand’s visibility and sales.
In conclusion
I trust that this guide on setting up an online store using WooCommerce has been beneficial for you. It covers everything from the basic setup to advanced customization, equipping you with the necessary resources to launch your e-commerce site effectively and professionally.
Hosting providers such as HostGator provide services that simplify the setup and management of a WooCommerce WordPress store, including automatic updates and continuous monitoring.
WooCommerce is a versatile e-commerce plugin that empowers entrepreneurs to build a virtual store tailored to their business needs, offering customization options for design, product management, payment, and shipping methods in the user-friendly WordPress platform.
Check our list of top website hosting providers for setting up your WordPress WooCommerce store. Feel free to ask any questions by leaving a comment. We’re here to assist you! 🙂
Published on April 1, 2024, with updates made on April 30, 2024.
Tutorials and WordPress are tagged together.


