

Creating a website can be difficult for many individuals, particularly when using a new design tool for the first time. Even user-friendly platforms can cause uncertainty for beginners.
If you’re looking to build a Wix website and need a straightforward guide from account setup to site launch, this article is for you. It demonstrates how you can easily create a professional and customized website with just a few steps using this tool. 🙂
This tutorial focuses on the Editor Wix, the recommended version for beginners creating their own website without design and programming experience. Professionals and agencies prefer the advanced editing features of Wix Studio.
Register for a complimentary Wix account.
To start building a Wix site, you need to sign up for free on the platform through a straightforward registration process. Simply go to the Wix website, click on “Start Now,” and follow the prompts to sign in using your Facebook or Google account if desired.

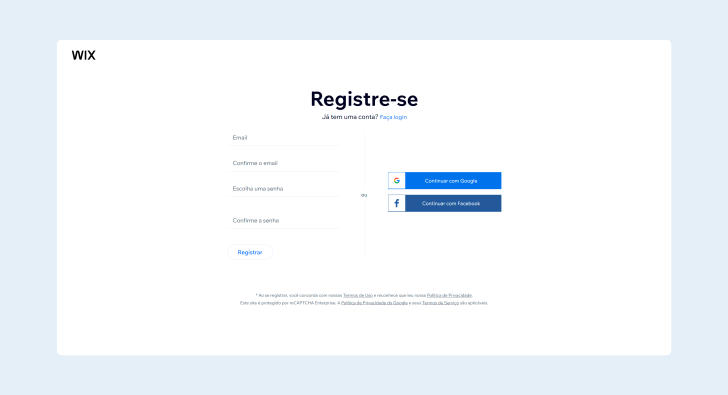
Begin by utilizing the assistance of Wix.
Soon after setting up your account, you can immediately begin building the website. Wix initially asks questions to determine the user’s site requirements and then guides them through the process by automating settings and content creation.
Identify the intended audience for the website to determine if the user is a beginner creating it independently or an agency/freelancer creating for a client. This distinction will impact Editor Wix’s recommendations for lay clients like entrepreneurs, professionals, and students, or Wix Studio for industry professionals and technicians.

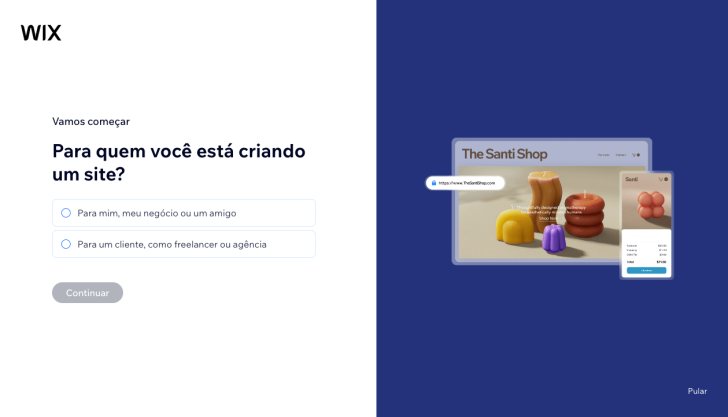
The screenshots shown in this article were taken from Wix at the time of creating this content. While they may change, the step-by-step process usually remains consistent. If you notice any differences, it is recommended to follow the tutorial as it will likely still be helpful. 🙂
Configure the control panel, whether with or without Wix AI.
Before starting to select and edit a template for a website, it’s important to first determine the type of website to be created and the desired features. This can include deciding between an institutional site, a landing page, an online store, or other types of sites, as well as specifying features like online scheduling, blog capabilities, or product showcase.
You can choose to use Wix’s AI by answering questions in the chat during the setup stage, or you can skip this step. Both choices are simple, and there is no pressure to use AI, especially if you prefer more control. Next, I will outline the two setup options: with AI and without AI.

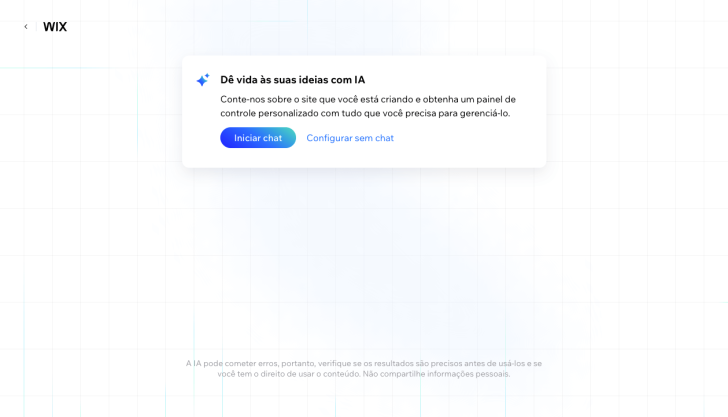
Configuring using Wix AI
The feature involves a conversation between the user and Wix’s AI, where the AI asks questions to determine the type of website needed and installs necessary applications accordingly.

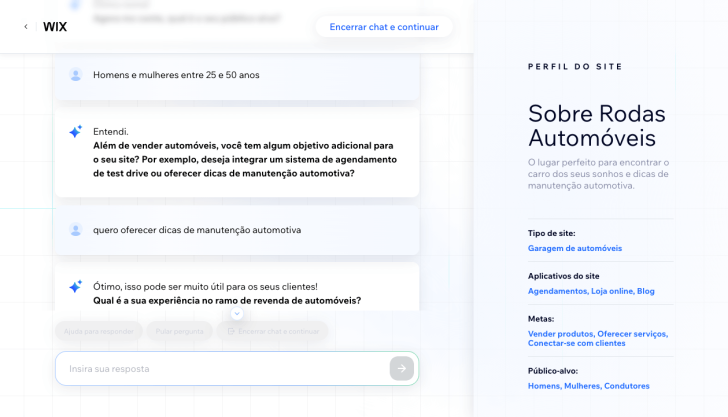
Configuring without Wix AI.
If you choose not to use Wix’s artificial intelligence, you can select “Configure without chat” in the image shown. Despite not engaging in a conversation, users are still provided with assistance through a series of questions they answer. The ultimate objective remains unchanged: to determine the website type for customizing the control panel with essential tools.
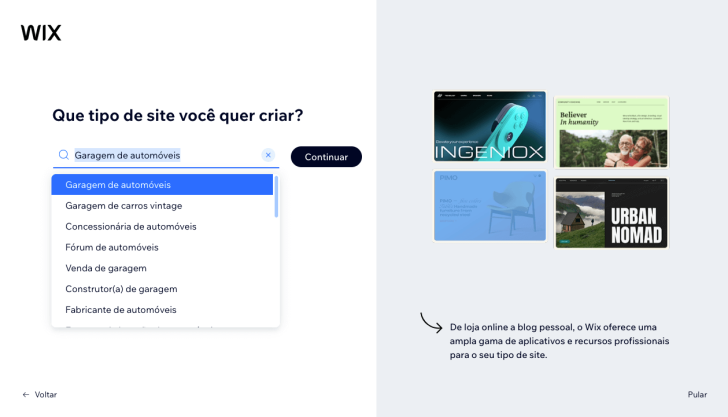
In this choice, you should specify the kind of website you wish to build. The tool will provide related options as you type. Select the most suitable option and proceed by clicking on “Continue,” as shown in the image. It’s worth noting that none of these steps are obligatory. If you wish, you can simply click on “Skip” and move on to the next step.

chsyys/Pexels
Wix inquires about the business name and address, along with other details, which can be added directly to the site without manual placement. You have the flexibility to respond, skip, and edit through the control panel at any time.

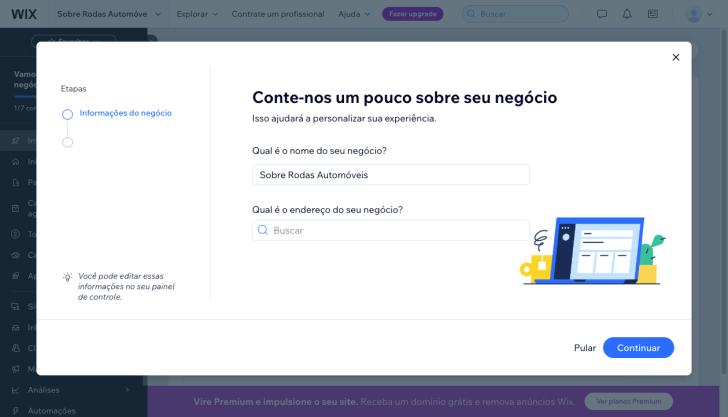
Filling in this information can be very useful and efficient for you when building your website on Wix. For instance, during one of the steps, you’ll be asked to choose the applications you wish to include on your site. By completing this task, the chosen apps will automatically be integrated when you select the template in the following step. Various examples of such apps include online store, scheduling, forms, chat, music, videos, and more.

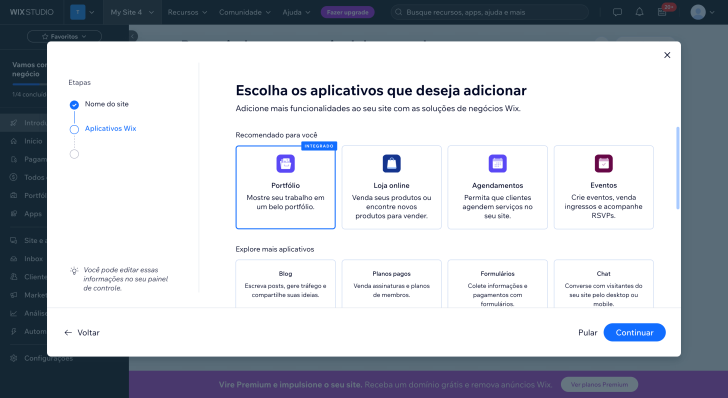
Upon finishing this procedure, the user is taken to the control panel, where the chosen apps from the previous step are already displayed in the sidebar menu.

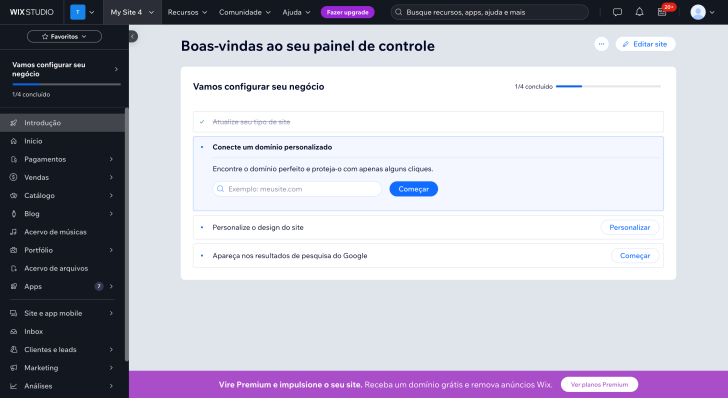
The tool recommends connecting the domain later to decide between a free or paid domain, which also involves choosing a plan. It’s important to customize the site with the editor first to see if Wix is the right tool for you.
Click on the “Personalize” button in the “Personalize site design” section to proceed to the next stage. Refer to the image in the control panel as a guide.
Customize the design of the website.
You can customize your website either using Wix AI or by yourself. With Wix AI, you can select a template to edit, while with the second option, the AI generates a personalized design for your site.

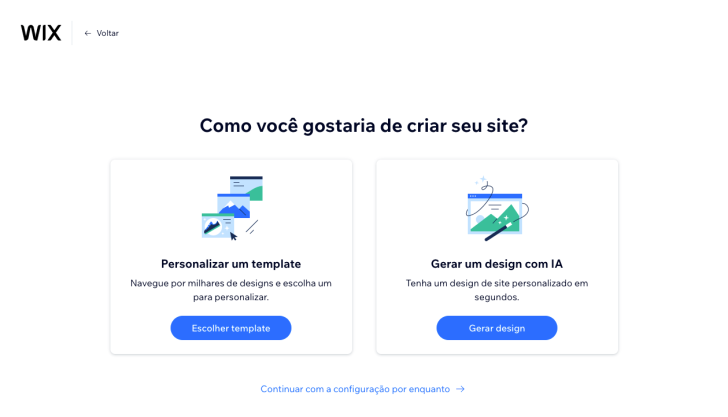
Customizing a template is my preferred option.
Wix offers a wide range of visually appealing and professional templates, making it my choice to start a site using one of these existing themes. This ensures that the foundation for building the site is based on good design and usability principles and provides valuable research material.
Click on “Customize a Template” to browse templates, select and customize your preferred one. Consider exploring a broader category for more template options if the pre-set filter is too limiting. For instance, in a simulation, opting for the “automotive” category revealed a greater variety of templates than the initial “car garage” selection.

chsyys/GettyImages

You can view the templates in their actual size before selecting one to edit. Once you have chosen a theme, simply click the “Edit” button to open the Wix website creator and begin customizing your site.

chsyys/ShutterStock
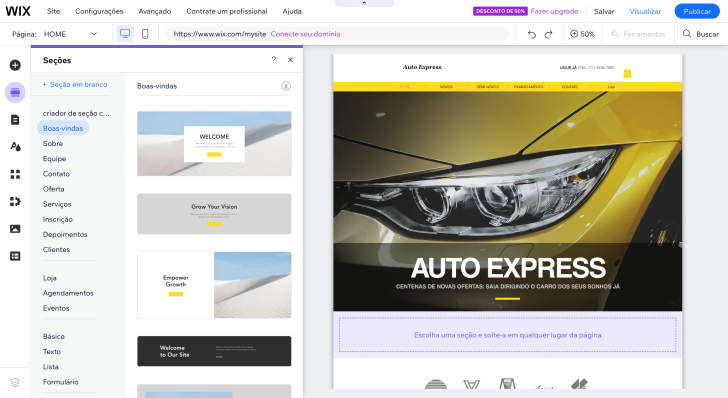
The Wix editor is user-friendly and offers all features through tool menus. Editing can also be done directly in the template by customizing each section. All elements like images, texts, sections, features, and pages are easily accessible within the Wix Editor.
Customizing a website is typically the most time-consuming stage, but a basic institutional site could be set up in just one day, depending on its requirements. Defining the content and pages, adjusting images, adding text, and incorporating elements like maps, forms, and social media links are essential steps. Wix provides tools that are pre-designed and easy to place according to your preferences. While installing certain apps may require more time, Wix integrations simplify the process for users.
I would like to provide a comprehensive guide on customizing a template in Wix, but it would be too lengthy due to the diverse editing options that vary based on the website type. I will explore this topic in a future article. Let’s now focus on utilizing Wix AI for personalized designs.
Generate a design using artificial intelligence.
If you would rather have Wix generate a custom design based on your input instead of choosing and editing a pre-made template, select the “Get an IA design” option. Providing as much information as possible to the AI can lead to a more successful design outcome.


The AI’s design is a preliminary concept that can be modified as desired by the user. If you prefer the layout but not the colors and style, you can request adjustments for that specific aspect. Additionally, you have the option to create a completely new design. After finalizing a design you are happy with, you can proceed with the latest version or revert back to a previous one.
AI simplifies website creation by suggesting layout, content, and structure based on a chat conversation where the user describes their preferences. This approach is user-friendly and beneficial, especially for those without prior experience in using website creation tools.
It is a new tool that is still being improved. Therefore, I believe creating the site using the Wix editor without the AI is preferable. Browsing through the available templates can be inspiring in finding what you need, and as they are more detailed, it can lead to a more professional website.
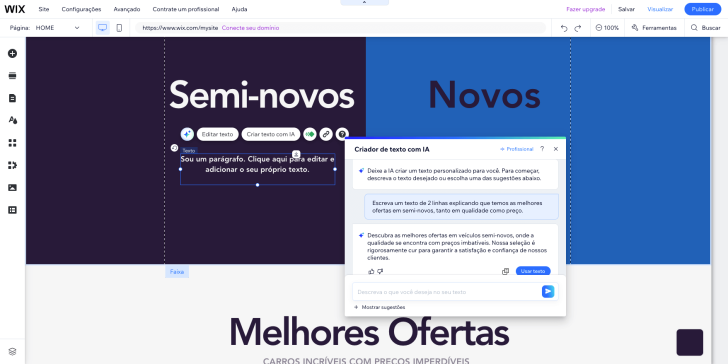
Using a template on Wix does not eliminate the need for Wix AI, which can assist in creating text by following your instructions and adjusting the tone to your preference.

Learn how to build websites using artificial intelligence by exploring WordPress with HostGator IA.
Select the address for your site.
Once you have finished customizing your site and preparing it for publication, the next step is choosing the domain, which will serve as your website’s internet address. Upon clicking “Save,” two choices will be presented: opt for a free Wix domain or create a custom domain.
The Wix domain is the sole choice available for those interested in building a free website. It follows the format: www.username.wix.com/sitename. This address may not be suitable for business websites or those aiming for a professional image. It is more suitable for testing the tool, creating a website without commitment, or for those unable to afford a plan. Explore this and other free website creation tools here.
A custom domain is the optimal choice for individuals with a business or professionals seeking to establish an online presence that appeals to customers and conveys trustworthiness. It provides your website with a concise and memorable address, like www.yourwebsitename.com. Whether utilizing Wix or another platform, owning a website with a personalized domain significantly enhances its impact.

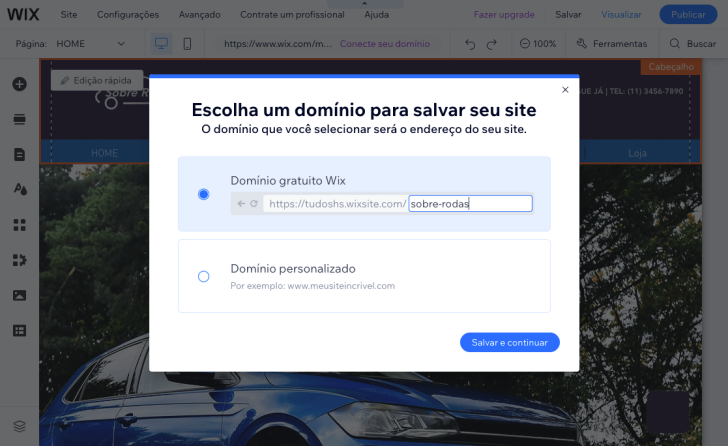
You can utilize your existing domain on Wix by upgrading to a Premium plan or start with a free domain and switch to a custom domain later.
Publish the website.
After you have personalized your website, you can make it accessible to everyone by publishing it online, which allows others to view it (previously only visible to you). Releasing a website on Wix is a simple process – simply select the “Publish” option within the editor.

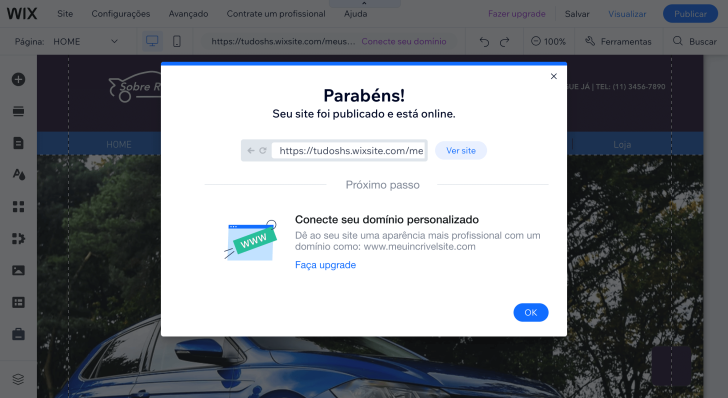
Professionalize your website by using a Wix Premium plan.
Consider upgrading to a Wix Premium plan if you have built your website on Wix and are satisfied with the tool. The Premium plan offers notable advantages over the free version, especially if you aim to create a professional website.
- Remove Wix ads to enhance professionalism on your site and eliminate the ads that come with the free version.
- Use your own domain on your website, such as www.yoursite.com, instead of a free address. You may receive a free domain for one year, depending on the plan.
- Having increased storage capacity and bandwidth is crucial for websites with numerous files or high traffic.
- E-commerce functions include establishing a full online store that can process payments, handle inventory, and generate discount codes. The availability of these functions depends on the selected Premium plan.
- Utilize advanced SEO and marketing tools to enhance website visibility on search engines and make use of marketing resources like campaign automation and social network integration.
- Customer service is available around the clock to assist with answering questions and resolving issues.
- Incorporate more apps and features by adding extra applications from the Wix store, like online booking tools, live chat, and advanced galleries.
- Customize the design further by using unique fonts and additional features, such as custom favicons, to enhance brand flexibility.
Investing in a Premium plan is recommended for individuals seeking enhanced professionalism, performance, and functionality on their website. Wix’s plans start at R$ 15 per month and include free hosting for all users.
To get started, you can simply sign up for free on the Wix website without having to purchase any plans.
Wishing you the best of luck and success with your website! Feel free to reach out to us with any questions or comments. 🙂
The article was first published on 25/02/2016 and updated on 23/01/2025.
Publication date: 24/01/2025 (revised on 25/04/2025)
Tutorials and Wix are the keywords associated with the content.


