

CloudFlare is widely recognized as a crucial tool for website owners and hosting services. However, its versatility extends beyond these areas, allowing users to redirect domains to CloudFlare without requiring a hosting server, all free of charge.
A domain redirect can serve various purposes.
- Point a domain toward a profile on a social network.
- Pointing an extra domain to the primary domain of a website.
- Redirect a page to a different URL after the page address has been modified.
- Redirect the “A” domain to the “B” domain following a site address change.
CloudFlare can be effectively utilized in all the scenarios mentioned. The setup process is straightforward, suitable for beginners. This guide will demonstrate how to configure different types of redirection on CloudFlare’s free version. Let’s get started!
- Who is this tutorial intended for?
- Why should one employ CloudFlare for domain redirection?
- How to set up domain redirection in CloudFlare: Register and add your domain, set up DNS entries for the domain, use CloudFlare’s nameservers, and create a redirect rule for the domain.
- Register and provide your domain.
- Set up domain DNS records
- CloudFlare supports domain nameservers.
- Establish the rule for redirecting the domain.
- Advanced instances of URL redirection within CloudFlare
- Enable SSL for better security.
- In conclusion
- Sign up and provide your domain information.
- Set up domain DNS records.
- CloudFlare supports domain nameservers.
- Set up the rule for domain redirection.
Who is this tutorial intended for?
This guide on redirecting domains in Cloudflare is useful for individuals who have registered a domain and wish to direct it to a different address, such as a social media page, a platform for virtual stores that doesn’t permit custom domain setup, a website hosted on another domain, and so on.
This guide is suitable for individuals seeking advanced redirect configurations with CloudFlare, particularly when a website undergoes an address change. In such instances, simply redirecting to the new URL is insufficient; it is crucial to maintain the rest of the address in the redirection process.
Why should a domain be redirected using CloudFlare?
CloudFlare is popular for being free, flexible, and effective, initially designed to combat spam on websites before expanding its range of services.
Setting up a domain or page redirect usually needs a hosting server along with the domain registration, as the latter only ensures address usage and DNS entry management. Redirects involve HTTP requests and responses, which are handled by web servers specializing in HTTP requirements. Therefore, registering a domain alone does not include a web server and does not automatically enable redirect configuration.
Some domain registration companies provide more than just registration services by offering free domain redirection. However, these services may have limitations, such as the case with Registry.br, which only offers redirection for national domains ending in .br without advanced DNS configuration options for setting up subdomains or professional email services.
Before CloudFlare, it was required to use a website hosting service to perform redirects, but often it was not worth it to hire a service solely for that purpose.
CloudFlare provides valuable free services like domain and page redirection without any set limit on the number of domains you can have on their free plan, making it a helpful tool for improving the internet.
How to forward a domain in CloudFlare
After considering the necessary factors, we will proceed to understand the process of redirecting domains using CloudFlare. The primary steps for redirection are:
- Sign up for CloudFlare and provide the domain information.
- Configure the entries in your domain’s DNS zone.
- Support CloudFlare server domain.
- Set up the redirection rule within the “Page Rules” section.
We will examine each of the mentioned steps in detail, along with advanced examples of redirects in CloudFlare to aid comprehension.
Sign up for CloudFlare and notify your domain.
To sign up for CloudFlare, provide your email and set up a password if you are new to the platform. Existing users can add a site by clicking on the ” + Add site” option displayed on the dashboard pages.

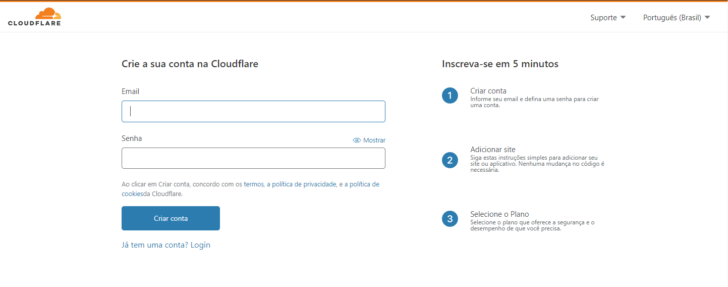
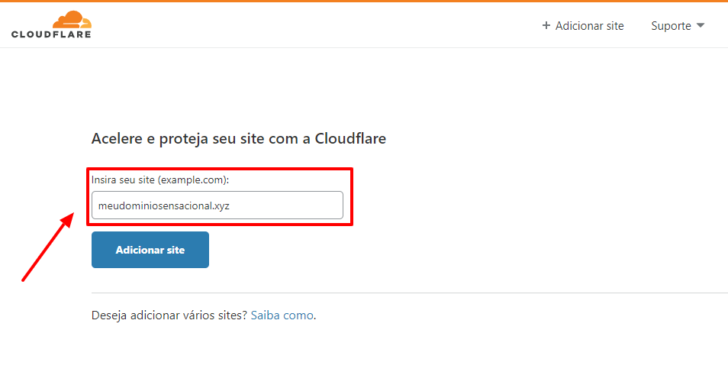
After providing your email and password, you need to specify the domain where you wish to set up the redirect in CloudFlare. Simply complete the relevant page for this purpose. The subsequent steps remain consistent for existing CloudFlare account holders.

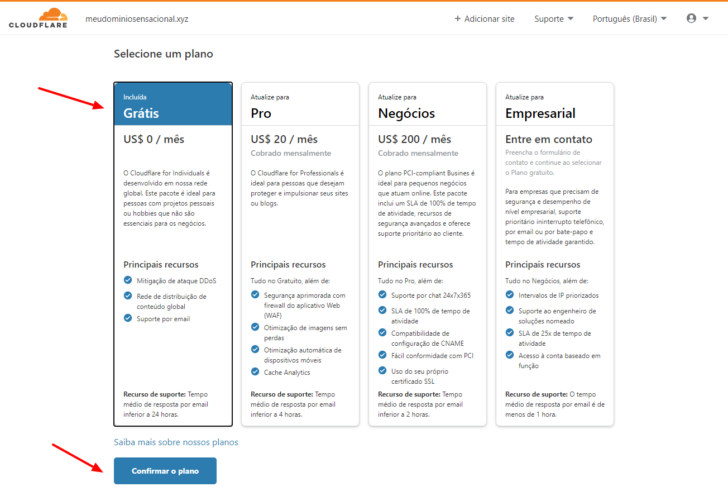
It is important to choose a plan for using the service on the following page. For redirecting a domain in CloudFlare, the free plan will be selected. The free plan can also be suitable for other purposes, such as improving website performance.

Configure the domain’s DNS settings.
After establishing the plan, it is crucial to examine and modify the DNS records of the domain. Understanding the following is essential:
CloudFlare scans the domain to find any existing records in the DNS zone. The scan results are shown on the screen. For a new domain without any configured services like email or website, all entries identified by CloudFlare will be deleted. If your domain has services configured, be cautious not to delete those specific entries. For inquiries, contact the support provided by the service company.

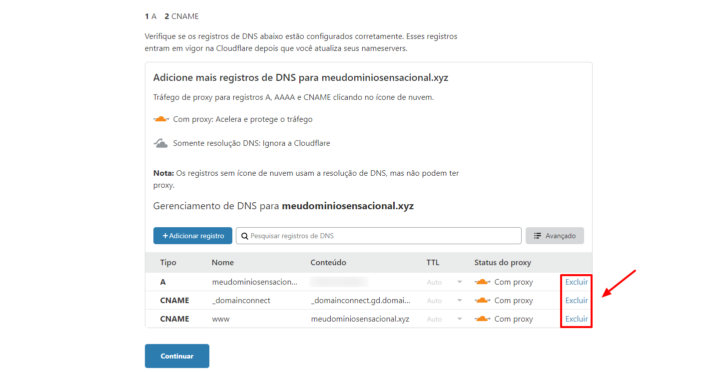
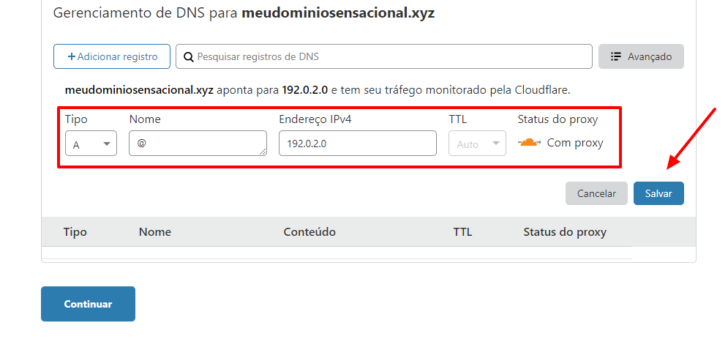
After removing current entries, I will establish the essential inputs required for CloudFlare functionality. I will set up a single DNS entry directing to any IP address as I aim to set up a redirect without the need for a hosting server. To achieve this, I will utilize a reserved IP, specifically 192.0.2.0, that is not linked to any internet server.
Click the “Add Registration” button to begin. Choose type A in the first field. Input an @ in the Name field to represent the complete domain. Provide the reserved IP in the “IPv4 address” field, set TTL to “Auto,” and select “With proxy” for the status. Lastly, save your entry by clicking “Save.”

I want the “www” version of my domain to also redirect. This time, I will only enter “www” in the name field, keeping the other fields the same.

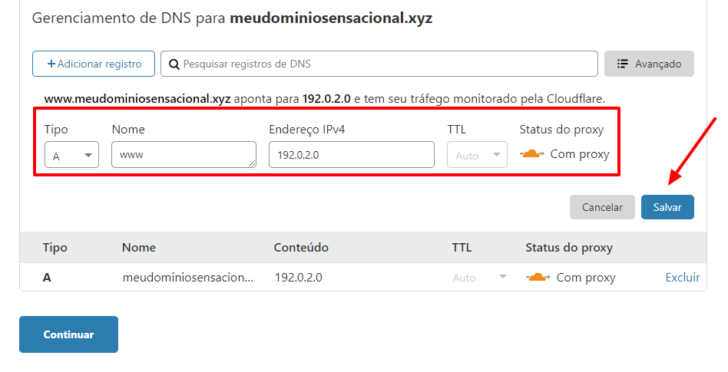
After adding the two entries, they will be displayed on the screen. It is crucial that both entries are set to “With proxy” under the “Pro proxy status” option, or else the redirection will not function.
To continue setting up, click the “Continue” button.


CloudFlare supports domain nameservers.
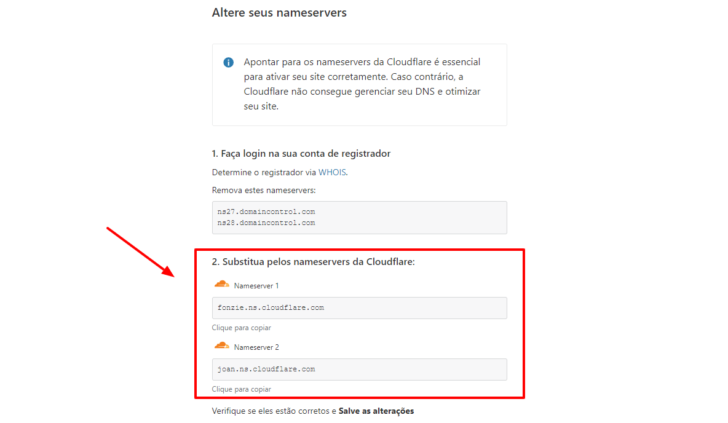
After you input the necessary minimum entries in the DNS zone, CloudFlare will provide instructions on updating the nameservers. Nameservers, abbreviated as NS, are entries that need to be directed to servers managing the DNS zone for the domain. It’s a common practice to refer to changing nameservers as “changing the DNS of a domain.” For further information, check out our DNS article.
The instructions for changing nameservers provide a detailed guide on how to correctly direct your domain to CloudFlare servers. Essentially, you need to log in to your domain registrar’s control panel and update the nameservers with the ones specified in your CloudFlare dashboard.
The image below shows the nameservers set up for my domain.

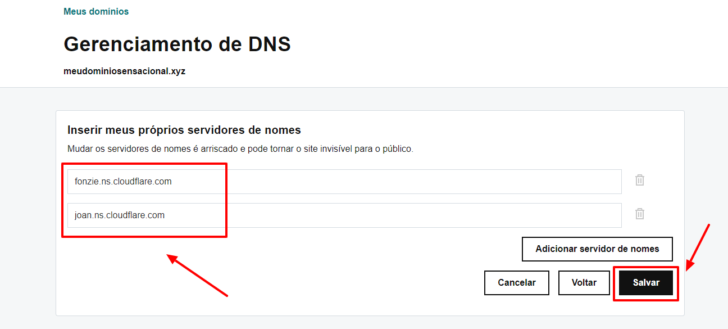
I utilized GoDaddy to register the domain for this tutorial, but this process can be carried out with any domain registration provider. I need to log in to the control panel of the company, in this instance GoDaddy, to update the nameservers for my domain. Within the nameserver management section, I can see the default values set by GoDaddy and replace them with the values provided in the CloudFlare dashboard.

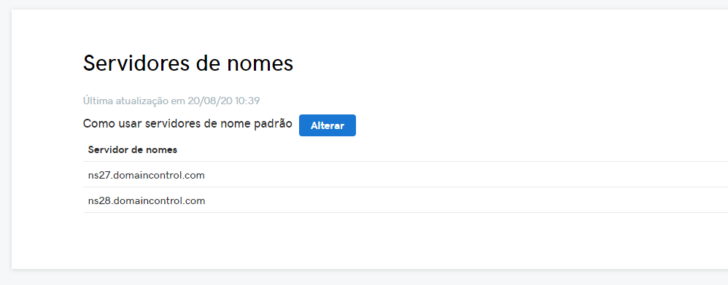
After clicking the “Change” button, I enter the new nameservers copied from the CloudFlare dashboard and save the changes.
Keep in mind that this process must be completed with the company where you originally registered your domain. All domain registration companies are required to offer a way to update the domain nameservers.

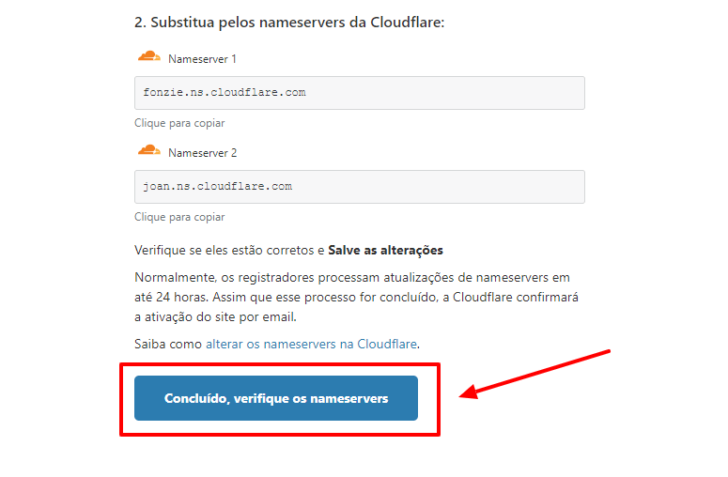
After making the change, go back to the CloudFlare dashboard. Look for the “Finished” button on the same screen as the change instructions and check the nameservers. Don’t worry if the check doesn’t finish right away when you click the button. This delay is a normal part of how domain changes propagate on the internet and it may take a few hours for CloudFlare to recognize the change.

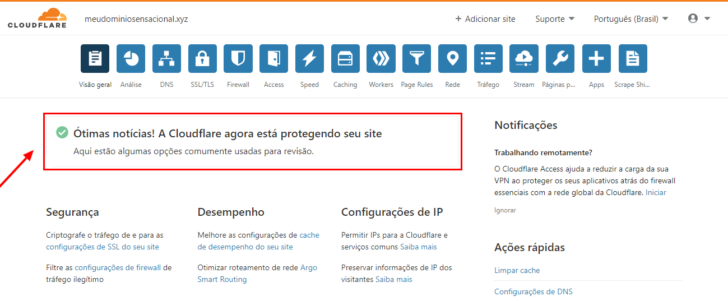
Upon successful verification of the modification, a caution message will appear on the CloudFlare dashboard homepage indicating that your site is being safeguarded.

Establish the domain redirect guideline within CloudFlare.
After the domain pointing is confirmed, proceed to the next step by setting up the redirection in CloudFlare. To do this, click on the “Page Rules” link located at the top of the page.

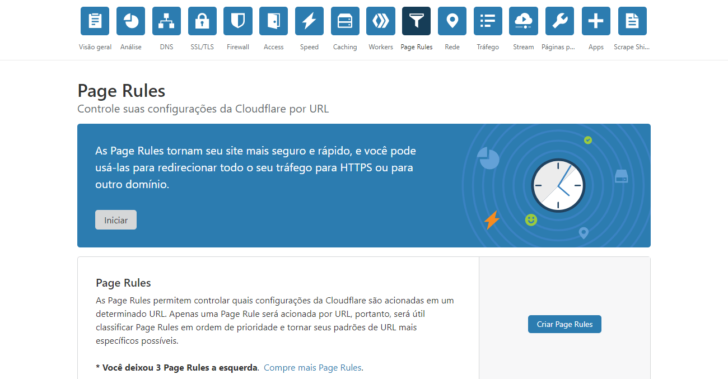
Click on “Create Page Rules” next.

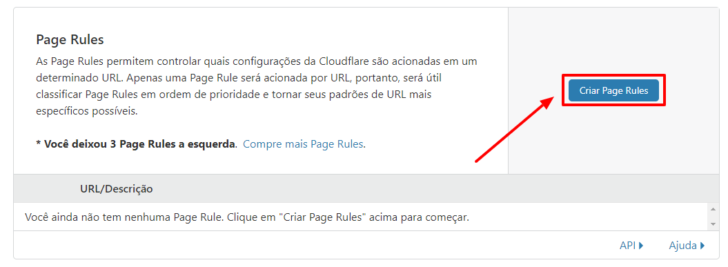
Now is the time that requires greater focus, as we will set up redirection in CloudFlare.
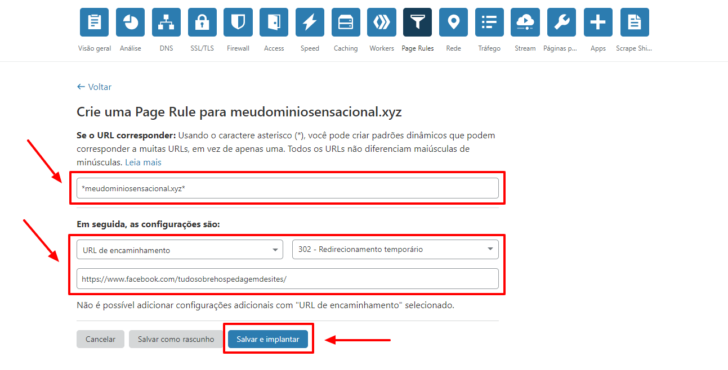
In the initial field, input the standard *dominio.com*, substituting dominio.com. with your domain. The asterisk functions as a dynamic character in regular expressions, representing any other character in any quantity. This character, commonly referred to as a wildcard character in regular expressions, will encompass any text preceding or following the domain in this specific URL example. Consequently, users visiting www addresses. dominio. or www. dominio.com/xyz will be impacted by the rule we will establish.
Select the “guiding URL” or “URL Forwarding” option in the settings, then choose between a 301 permanent redirect or a 302 temporary redirect. Finally, specify the destination address for redirecting your domain, such as redirecting it to the TSHS page on Facebook in this case.
Click on “Save and Deploy” after filling out the fields.

chsyys/Burst
The rule that has been put into effect is shown on the Page Rules page.

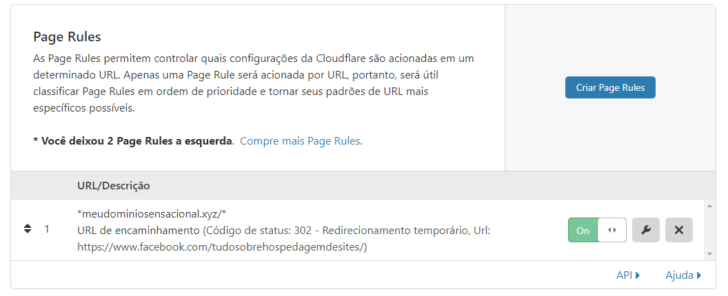
This is everything you need to do to set up a basic redirect on CloudFlare. You can direct the redirect to any desired page by specifying it in the final field.
This illustration does not encompass all potential scenarios. Below, we will explore additional instances of redirects utilized in CloudFlare.
CloudFlare demonstrates advanced instances of URL redirection.
The process outlined above can be used in various ways. Nonetheless, the final rule configuration field always designates a specific page as the redirect destination.
How can we redirect a URL with add-ons and preserve these add-ons after the redirection? For instance, how do we redirect www.domainA.com/who-are-we to www.domainB.com/who-are-we? Let’s explore the process.
To solve this issue, you can utilize variables in the redirect rule. By using asterisks in the initial field, you can capture any value in that part of the address. In CloudFlare, variables are denoted by the symbol $ followed by a number corresponding to the order of the asterisk in the first field.
To redirect www.dominioA.com/page-anyone to www.dominioB.com/page-anyone, you can input dominioA.com in the first field and https://www.dominioB.com/$2 in the second field, with $2 capturing any data within the second asterisk.

chsyys/FreePik
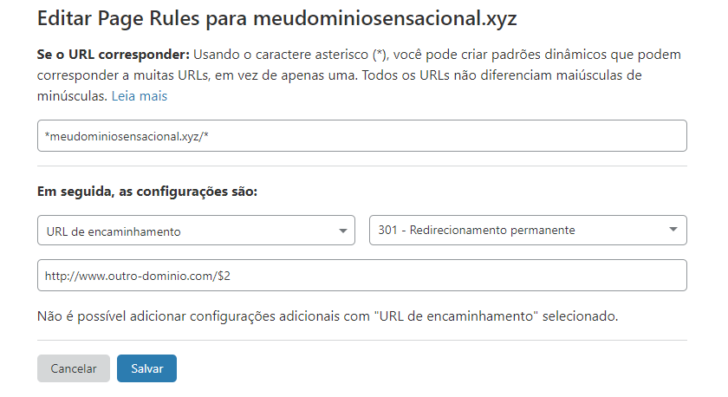
Possible redirects can be seen in the following examples when setting up this rule.
- http://dominioA.com/page-x redirects to https://www.domainB.com/page-x
- https://www.dominioA.com/page-x is redirected to https://www.dominioB.com/page-x.
- https://dominioA.com/pagina-xyz directs to https://www.dominioB.com/pagina-xyz
The system needs the http:// or https:// protocol at the start of the redirect address, as shown in the previous example where the variable for the first asterisk was not included. This requirement makes it impossible to utilize the variable for the first asterisk in such cases.
This technique is beneficial for ensuring that all traffic is conducted through the HTTPS protocol. In such instances, the same domain will be utilized in the second field, with the preferred protocol placed at the start of the URL and the variable at the end.

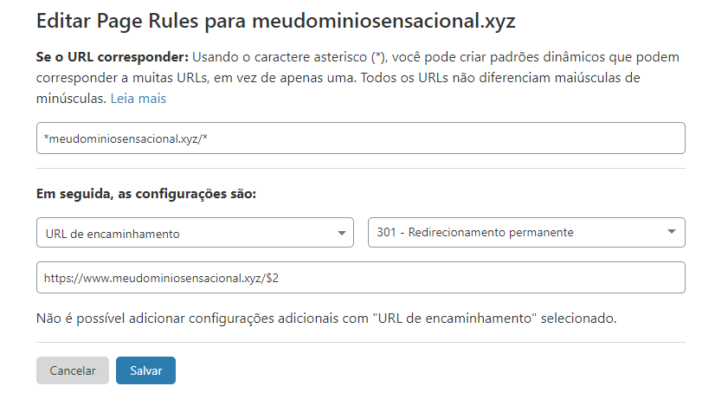
In the two instances mentioned earlier, it is important to observe that the redirection is a type 301, indicating permanence. This type of redirection informs search engines that the URL change is permanent and is advisable in different scenarios, as illustrated here.
Enable SSL to guarantee that the redirection of the HTTPS protocol will occur.
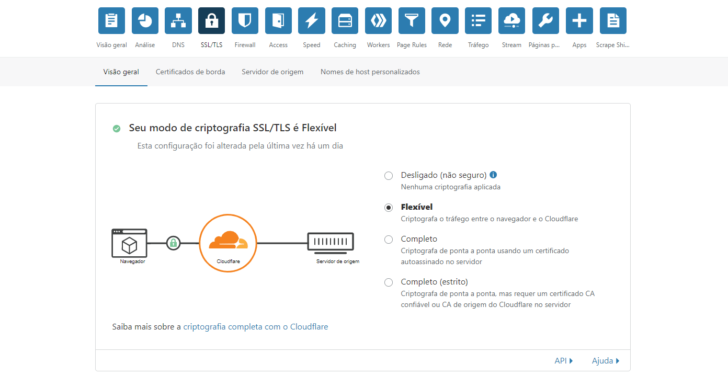
To make sure that the forwarding includes requests made over HTTPS (for example, https://domain.com), activate the SSL certificate in the CloudFlare dashboard.
The process is straightforward. Visit the SSL/TLS section and select an encryption method. For instance, if you are not running a hosting server and are solely using CloudFlare for redirection, opt for the Flexible choice. This selection ensures that traffic is encrypted only between the browser and CloudFlare.

Conclusion
It is simple to redirect a domain in CloudFlare, which provides various useful services beyond redirection even in its free mode. In addition to setting up redirects, you can manage a domain’s DNS, protect websites from threats, and enhance page loading speed, among other features. Check out an article for detailed information on CloudFlare setup.
Leave a comment if you have any inquiries, and I will be happy to assist.
After setting up a redirect, consider setting up a professional email using your domain to enhance your business credibility and image with customers. Check out our list of top professional email services, including a free option. 😉
Publication date: 24/08/2020 (revised on 17/12/2020)
CloudFlare tutorials are tagged.


