

Agility in communication is essential for the success of online businesses. Implementing an online chat service can enhance user experience and provide efficient customer support by enabling direct and real-time communication between the company and its visitors.
This tutorial provides a comprehensive and user-friendly guide for setting up an online chat on your website, covering tool selection and site integration. It offers a way to enhance customer service, regardless of your business’s industry or size.
What does online chat refer to?
Online chat is a live communication tool that enables website visitors to interact directly with customer service agents or support representatives through an integrated chat window on the site. Users can engage in instant communication by sending text, audio, or sharing files.
Online chat provides a swift and efficient option for customer support, offering personalized assistance tailored to individual needs, which is more responsive compared to traditional methods like email or phone.

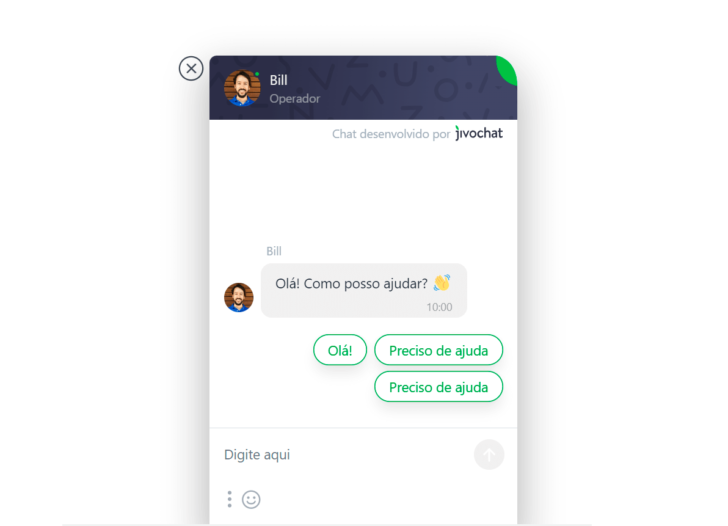
Having an online chat feature on your website can set you apart in customer service, leading to increased user satisfaction, building brand trust, and boosting the success of your online business.
Installing the online chat on the website can be done by following a set of sequential instructions.
We will now learn the process of installing an online chat tool on any website.
Selection of chat and sign-up tool
The initial step is selecting an online chat platform, with numerous options available, such as JivoChat, LiveChat, Zendesk Chat, and LiveAgent.
The selection of the perfect online chat tool may differ depending on the situation. Thus, I suggest evaluating the available choices and making a decision based on the resources desired and provided. Criteria such as features, user-friendliness, customization, and cost should be considered.
We decided to use JivoChat for this tutorial to demonstrate the examples. The tool provides a free option with essential features, as well as cost-effective paid plans.
We will utilize HostGator’s hosting services to set up the online chat feature on the website, as it provides multiple options for website publication and editing. The process of integrating a chat tool into a website hosted on HostGator will be discussed in detail.
Obtaining the code necessary to set up online chat
To begin, you need to register for a JivoChat account on their website. The process is straightforward and, as you set up your account, you will receive a distinctive installation code for your website. Remember to save this code in a text editor for later use.


chsyys/DepositPhotos
The service provides installation options for various content management systems like Wix, WordPress, Magento, and Drupal. Different methods for adding code to the website will be discussed.
Using WordPress to add the code to the website
Inserting the online chat service on WordPress websites is simple because the service provides a dedicated plugin for this platform, making it easy to set up by accessing the WordPress admin panel as the initial step.
The WordPress admin panel is typically reachable by visiting the mysite address. com.br/wp-admin and entering the WordPress administrator’s login and password. HostGator customers can also access the WordPress dashboard through the customer dashboard at https://cliente.hostgator address. com.br/ using their customer credentials.


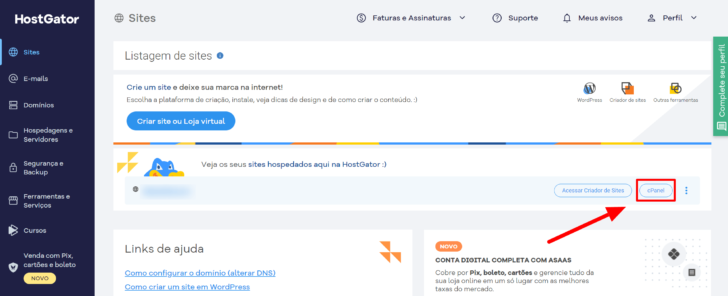
Once in the customer dashboard, find the website where you wish to set up the live chat and select the cPanel option displayed in the image.

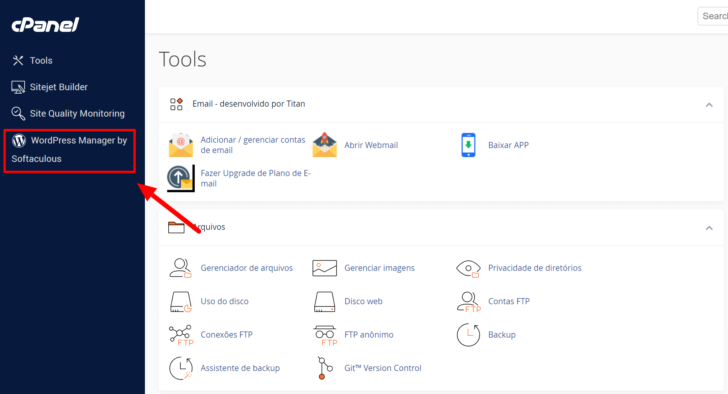
Access the WordPress installation manager within the cPanel interface by navigating to the left side menu.

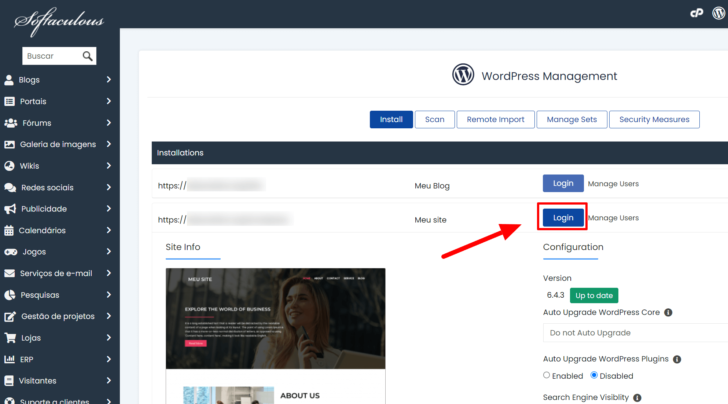
Clicking the login button on the relevant site will take you directly to the WordPress panel, eliminating the need to input your login credentials.

In the WordPress dashboard, navigate to “Plugins” and then “Add new plugin”. Search for “JivoChat” in the search field.

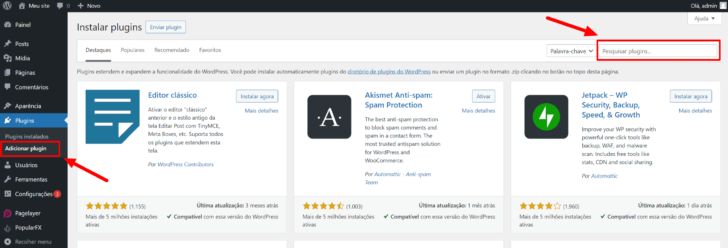
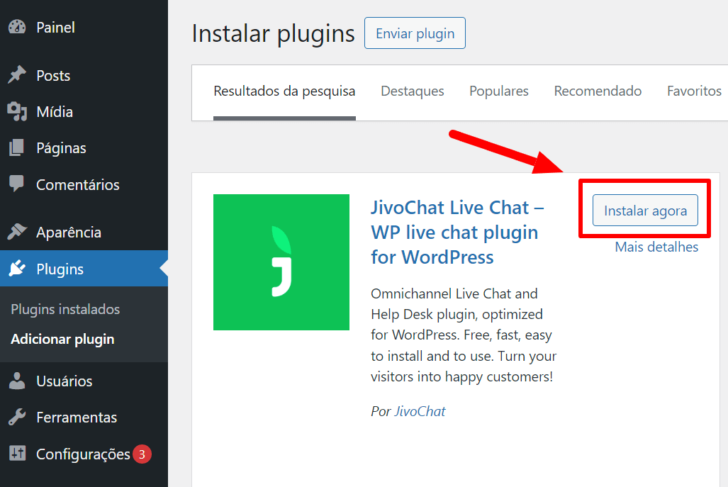
After finding the plugin, select “Install Now”.

chsyys/UnPlash
chsyys/iStock
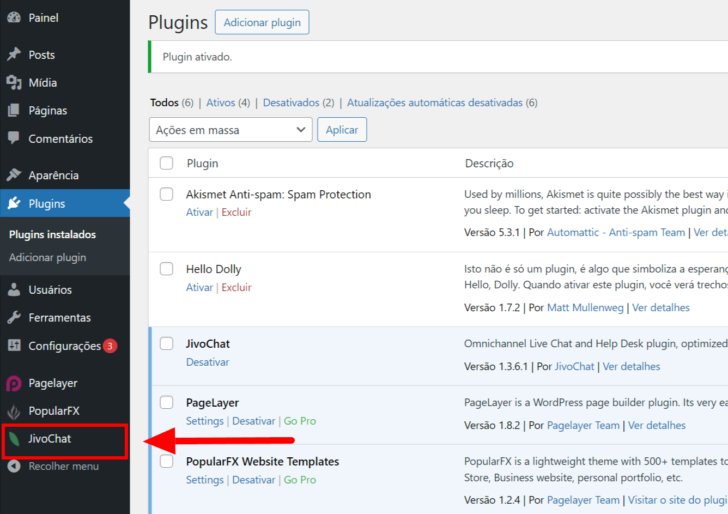
After you install and activate the plugin, access the “JivoChat” option in the side menu.

chsyys/ShutterStock
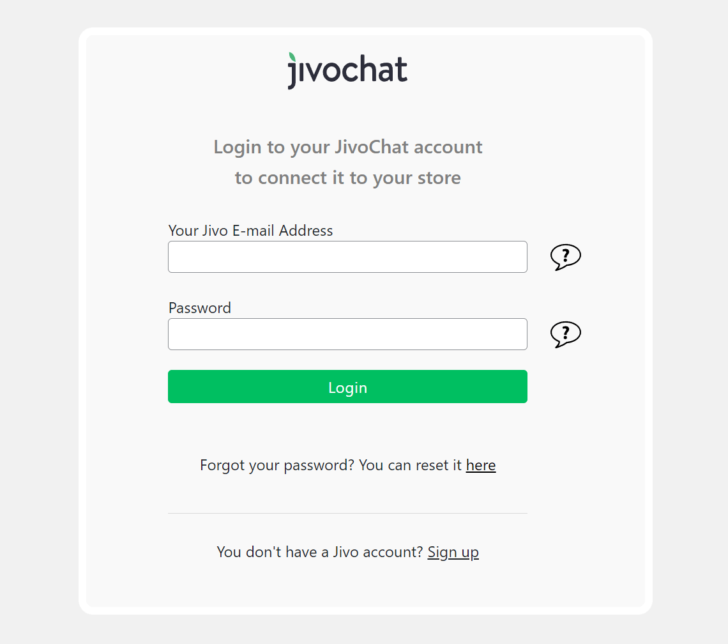
A registration screen is shown for new customers to sign up directly in the WordPress panel. If you already have a JivoChat account, simply click the “Log in” link located at the bottom of the page.

chsyys/PixaBay
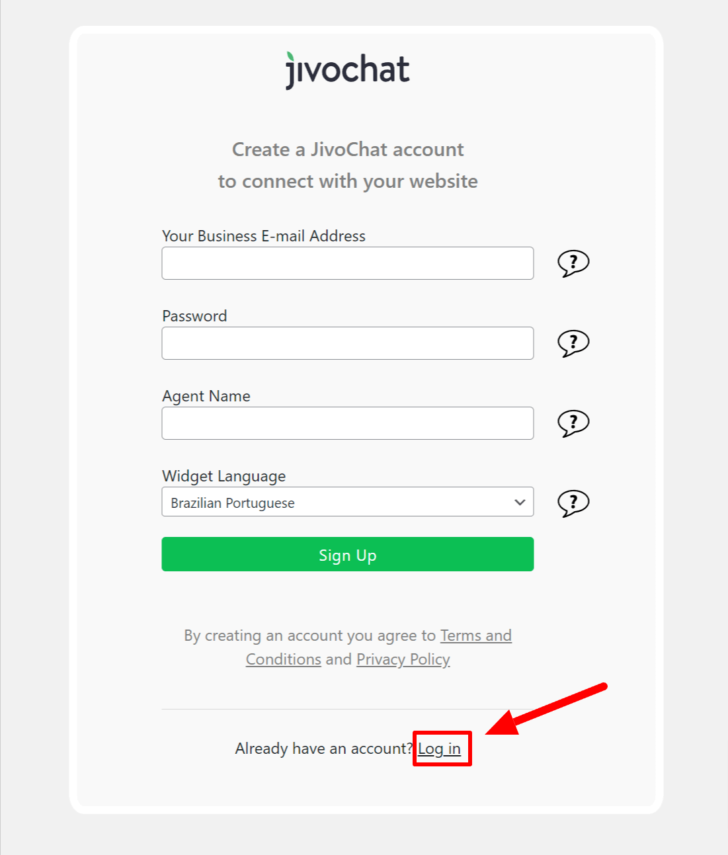
Simply provide the login and password you utilized when setting up your JivoChat account.

chsyys/GettyImages
chsyys/Flickr
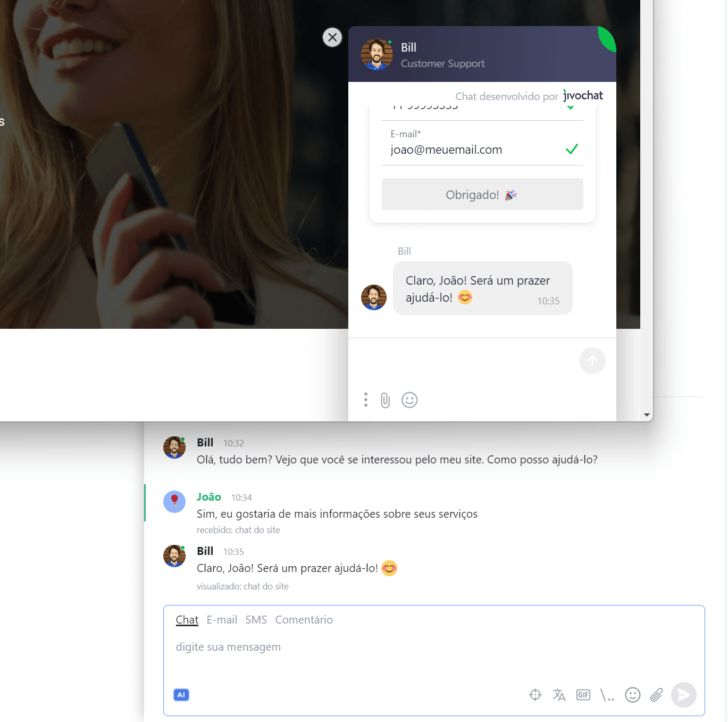
After completing this process, the chat window will be displayed on every page of your website and accessible to all visitors.


Interact with the chat to monitor the conversation within the JivoChat admin panel.

Using the HostGator Website Creator to add the code to the site.
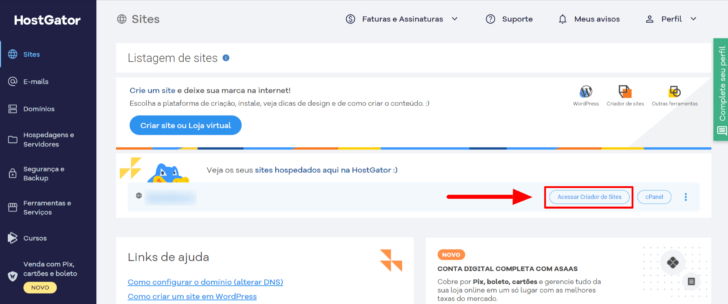
Using HostGator Website Creator, inserting online chat is a straightforward process. Access the HostGator client panel and click on the “Access Website Creator” link to proceed.

Once you are in the editing panel of the website creator, find the “Adjusts” option in the side menu. Then, go to settings and select “Insert HTML code”.

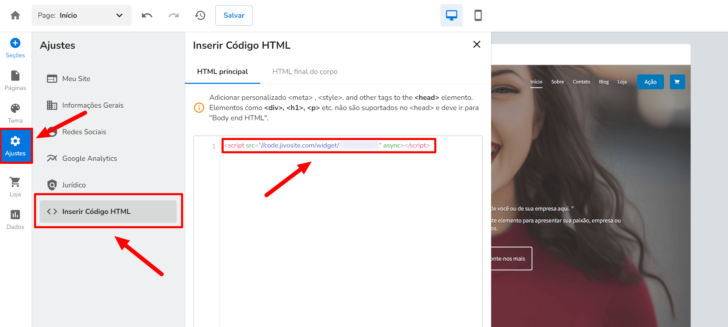
Paste the code from the online chat tool into the “Main HTML” tab in the window that appears. Save the changes and publish them on the site.
When you visit your website, you will notice that the chat window appears at the bottom of the site.


If you initiate a chat conversation, you will notice that it shows up instantly on the Jivochat dashboard, as previously observed.


That’s everything required to set up the online chat on the HostGator Website Creator. Easy, right?
Including the code on the website by hand
If you have a website on a different platform or in another language, you can manually insert the code provided by JivoChat during registration. HostGator clients can add the code in various ways, including using the cPanel file manager, which is the hosting control panel.
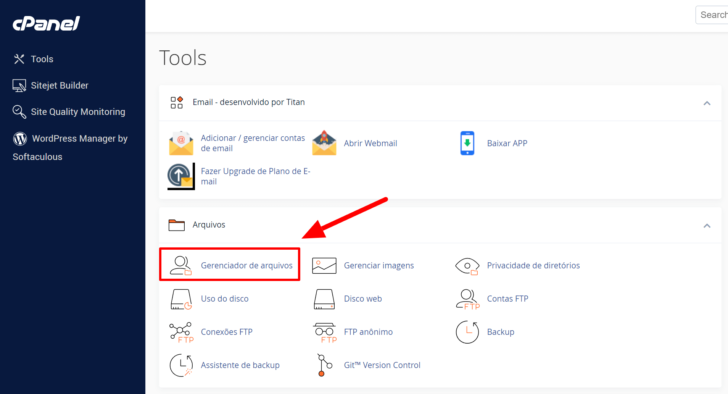
The initial step is to open cPanel through the HostGator client area, as previously demonstrated. Once in cPanel, find the “File” category and select “File Manager”.

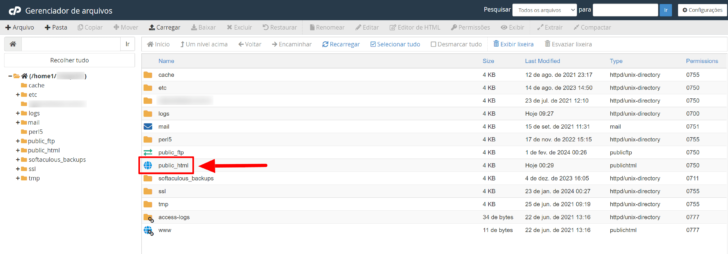
Locate the “public_html” folder within the file manager to access the files of any website that is publicly available on your hosting.

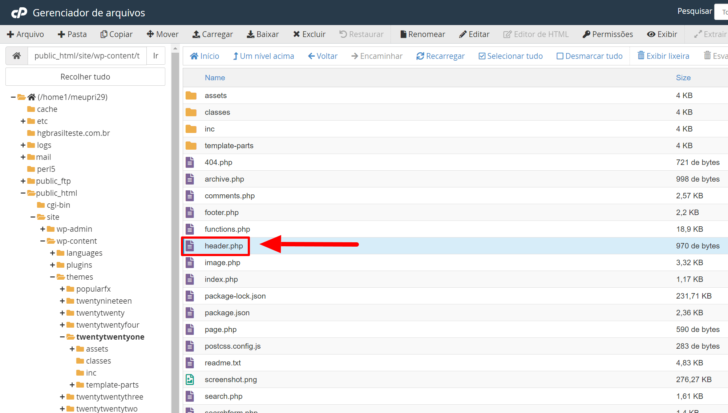
You can find the file in public_html that includes the
tag of your website. If you’re experienced in website development, this should be easy. If you’re unsure how to find it, consider asking for assistance from the HostGator support team or your website developer.In the given example, the
tag can be found within the header.php file. To edit it, I will choose the tag and then select the “Edit” option from the file manager’s top menu.
You can make changes to the file by clicking the edit button. Insert the code given by the online chat tool within the
tag and save by clicking the “Save” button at the top of the page. Imagem: Chakkree_Chantakad/Pexels
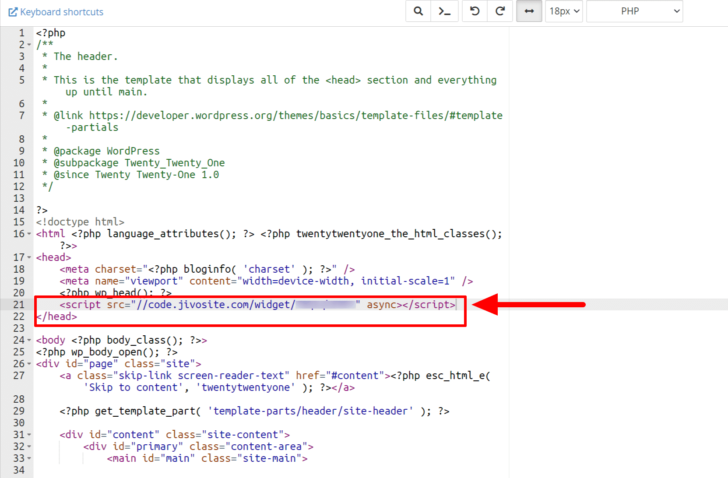 Imagem: wal_172619/GettyImages
Before making modifications to any file in a website’s source code, it is crucial to create a backup in case of any issues. If version control tools like Git or SVN are being used, it is recommended to make changes in the repository to keep track of modifications accurately.
In conclusion
Implementing an online customer service chat on your website provides advantages for visitors and your business by offering immediate and personalized support, leading to increased satisfaction and loyalty.
The straightforward setup and configuration of online chat tools on the market allow even beginners to easily add an online chat feature to their website with proper guidance.
If you haven’t found a hosting service for your website yet, take a look at our list of the top hosting companies on the web.
Publication date: February 28, 2024
Tags: Tools, Guides


