WordPress Multisite is a beneficial feature for website administrators looking to streamline the management of multiple WordPress sites through a single dashboard. It allows users to create and oversee a network of websites, making it a practical solution for different situations, such as businesses with multiple locations and bloggers managing various projects.
This article delves into the concept of WordPress Multisite and offers a comprehensive guide on setting up a network of websites using this feature. It covers everything from installation to best practices for managing the network, providing a detailed walkthrough for users of all levels to leverage the capabilities of WordPress Multisite.
WordPress Multisite is a feature of WordPress that allows you to create a network of multiple websites from a single installation.
WordPress Multisite enables the management of multiple websites through a single WordPress installation. Sites within the network share core files but maintain separate tables and folders for content in the database and server. The network admin has control over themes, plugins, and website creation, while individual site admins can customize themes, manage plugins, and publish content autonomously.
WordPress Multisite allows for the creation of various types of websites such as blog networks, educational platforms, portfolios, and online stores. Enabling WordPress Multisite involves editing two files and following specific steps in the control panel. Admins can opt for either subdomains or directories for their network websites.
The primary characteristics of WordPress Multisite consist of:
- Manage all of your websites using just one administrative panel.
- Features like plugins, themes, and updates can be shared among sites, saving disk space and simplifying maintenance. Installing plugins or themes just once allows you to activate them for all websites if desired.
- Multisite administrator has complete authority over determining who can establish new websites and what permissions users receive, offering flexibility in assigning responsibilities and managing general administration.
- Each site in a Multisite environment can have unique content, design, and settings despite sharing features, enabling tailored customization to meet specific requirements.
- Managing multiple websites from one installation saves time and resources compared to maintaining separate WordPress installations for each site.
We will learn the specific steps for activating the WordPress Multisite network.
Installing a network of WordPress sites with Multisite functionality.
Installing WordPress Multisite requires following specific steps. In the upcoming tutorial, we will show how to set it up from the beginning, starting with a fresh WordPress installation and then activating WordPress Multisite.
Installing WordPress Multisite on an existing site with previous content and customizations can be accomplished. It is advisable to back up the site before making any modifications.
Let’s start moving forward with the example of using Hosting WordPress hosting to set up the Multisite system, which offers great cost-benefit plans starting from R$ 11.99. Check out the available plans if you’re interested.
WordPress can be set up on different hosting platforms, although the interface may vary slightly. Nonetheless, the configuration process for WordPress Multisite, which is crucial in this scenario, should be quite similar. Let’s proceed.
WordPress setup
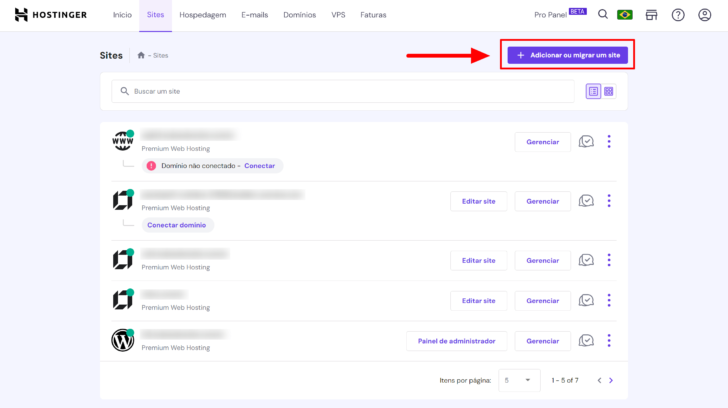
We will think about using Hostinger’s hosting service for the tutorial. To add or transfer a website on Hostinger’s panel, go to the Sites tab and select the appropriate option.

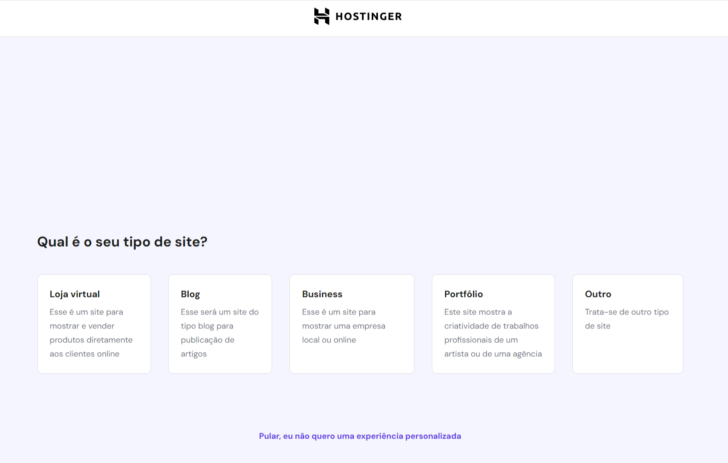
The setup wizard will appear, where you can select the kind of website you wish to make, like an online store, blog, business site, portfolio, or another type. For simplification in explaining the Multisite WordPress setup, I will opt for “Other.”

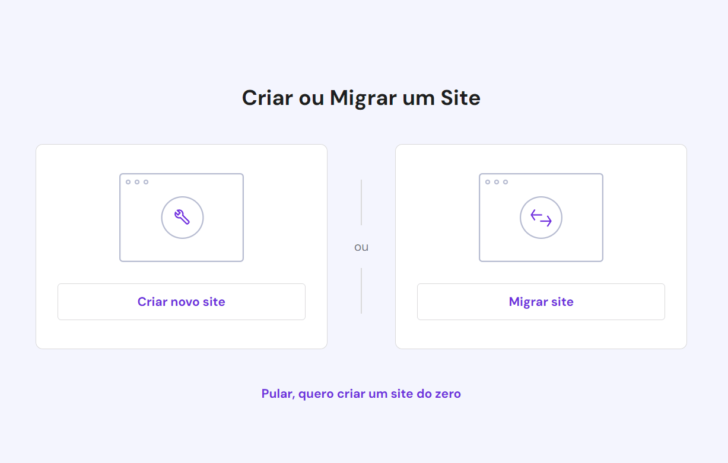
The wizard now requests the user to choose between creating a new website or migrating an existing one. Let’s select the “Create new website” option.

chsyys/KaboomPics
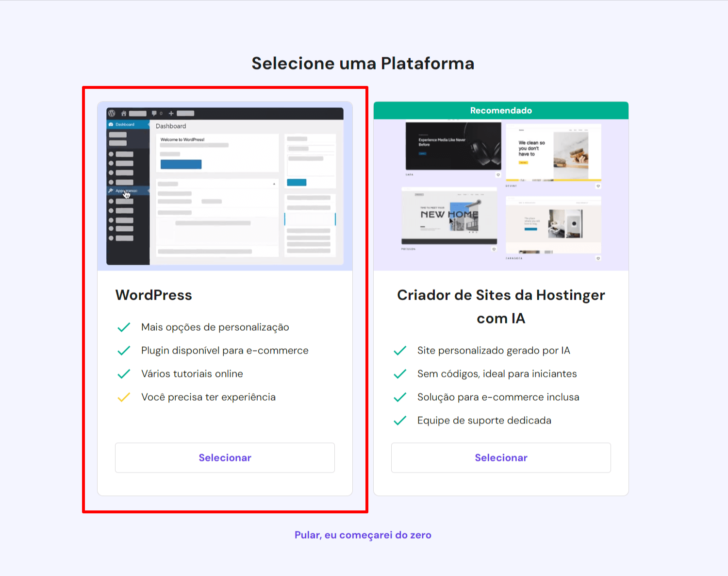
Choose the WordPress option or utilize Hostinger’s website builder with an artificial intelligence system to help you create website content. More details are discussed on this page.
Our goal is not to utilize the website creator, so we will opt for WordPress instead.

chsyys/FreePik
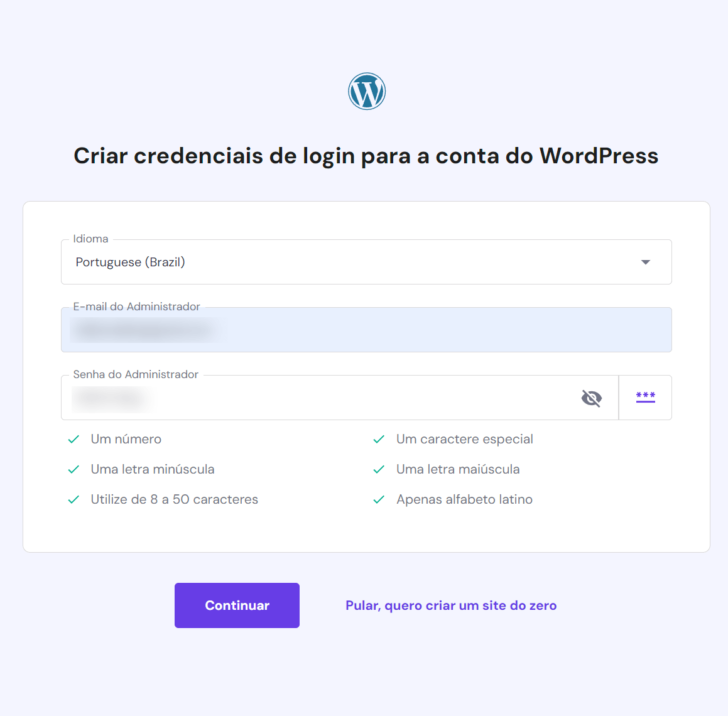
Please provide the email address and password to begin installing WordPress.

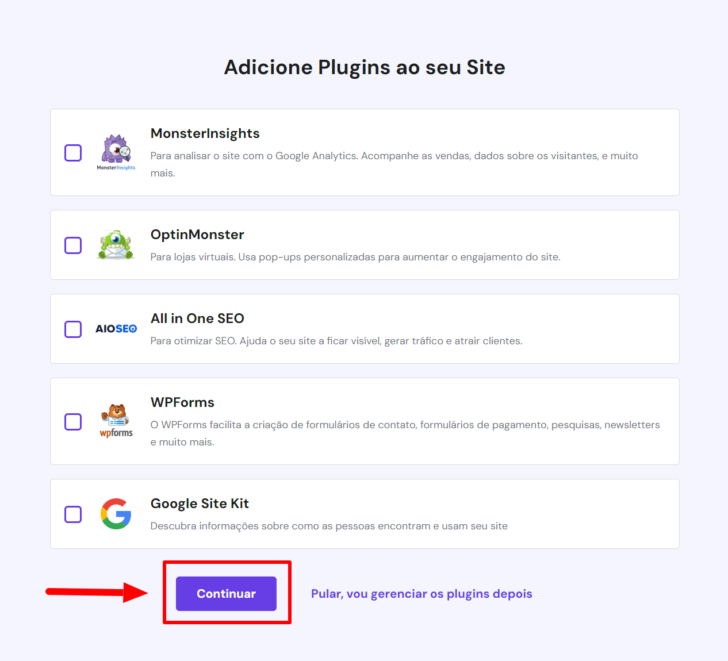
In the following stage, you have the option to choose essential plugins for installation. It is recommended to explore the suggested choices, but for simplicity, we will continue without selecting any plugins.

The WordPress setup tool at Hostinger recommends certain themes that can be modified later. I opted not to select any of them, so WordPress was installed with the default theme of the current version. It’s fine to choose one of the suggested themes to begin customizing your site, as they can be changed later if needed.


In the following stage, you should set up a domain for the website. If you possess a domain already, select “Use an existing domain.” If not, you can register a domain here or through another service. Since I have a domain, I opted to utilize it. To explore alternative options, refer to a comparison of domain registration platforms.

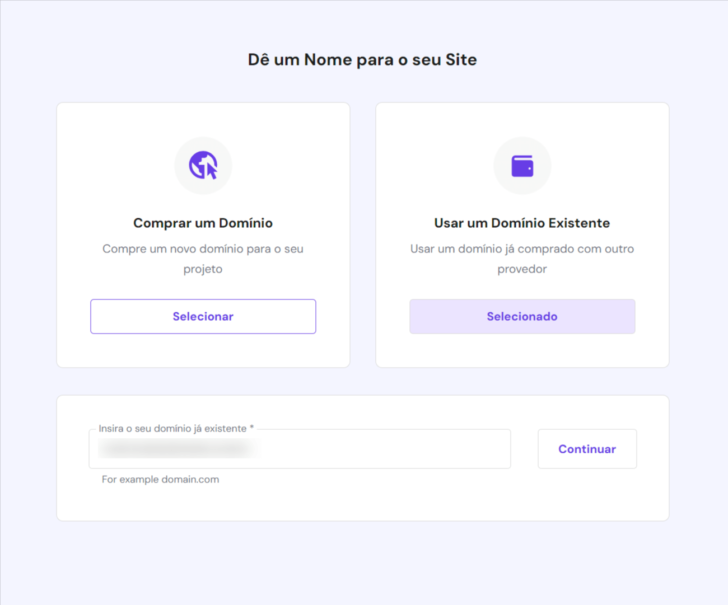
The installation process starts soon after informing the domain. It is important to ensure that the domain is directed to Hostinger servers to enable immediate use of the website post-installation. If the domain was registered with Hostinger, it is probably configured on the hosting. If not, you will have to set up the domain DNS accordingly, as detailed in Hostinger’s support documentation.
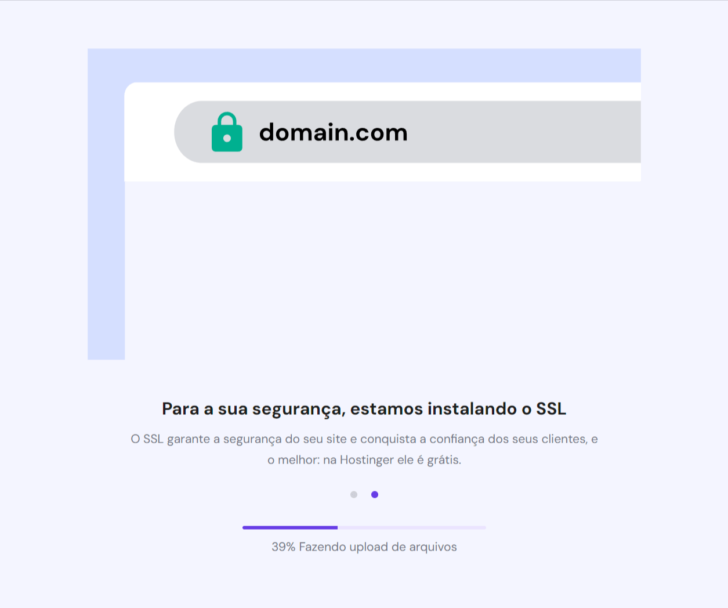
The Hostinger wizard not only sets up WordPress but also installs chosen plugins and themes, along with an essential SSL certificate. Proper domain configuration in the hosting is crucial for this process.

After setup, the wizard presents three choices: link the domain, modify the website (in the WordPress dashboard), or access the hosting control panel.

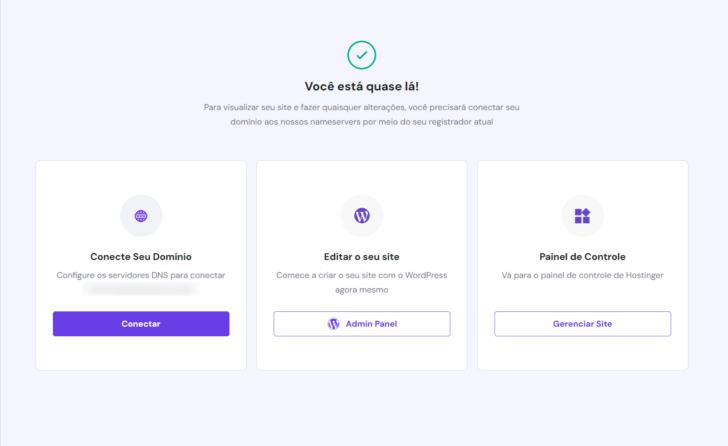
To set up WordPress Multisite, you must modify certain files located on the hosting server. To do this, we will first access the hosting control panel before moving on to the WordPress panel. Let’s get started!
2. Activate WordPress Multisite.
The user is directed to the WordPress site management screen after clicking on “Control Panel” in the previous step. Look for “File Manager” and open it by clicking on it. It will open in a new tab.

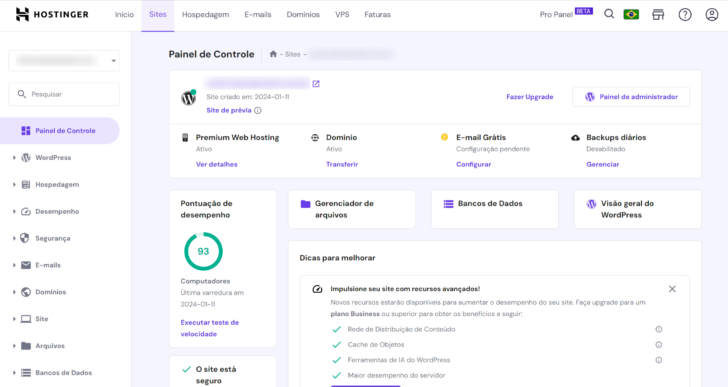
Navigate to the public_html directory within the manager, where the website installation we just completed is located.

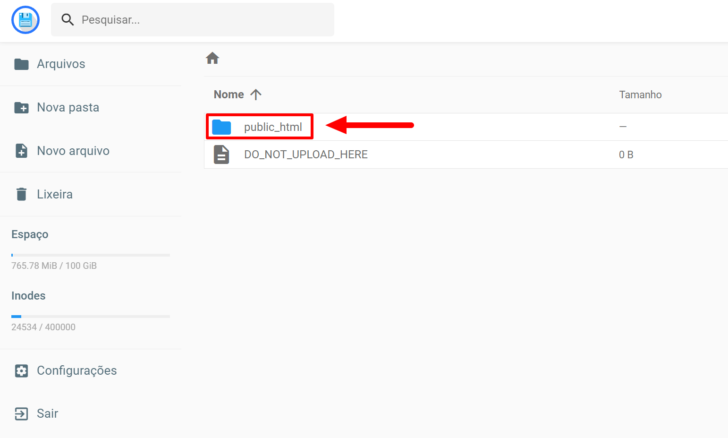
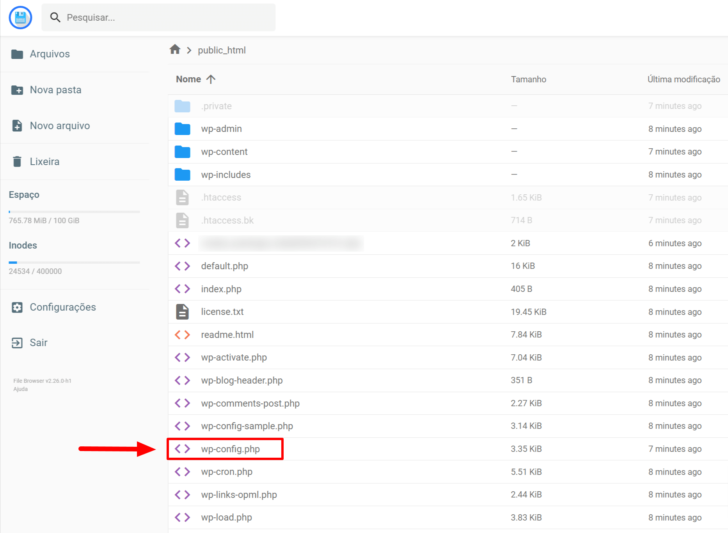
Inside the public_html directory, you will find the WordPress files and folders. Open the wp-config.php file by double-clicking on it.

When you have your wp-config.php file open, find the line containing /* That’s all, stop editing! Happy blogging. */ and add the following code before it.
The outcome is comparable to the one shown in the image below.

chsyys/UnPlash
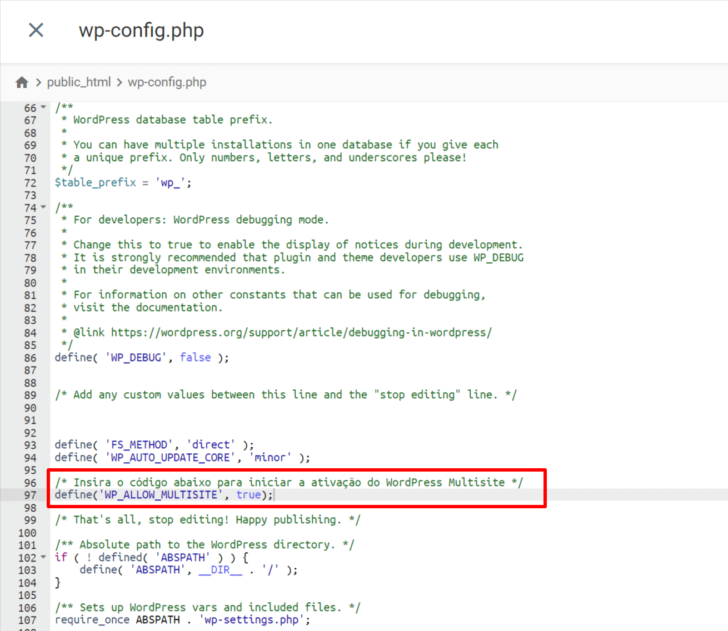
After inputting the code snippet, select the save icon positioned at the top right of the page.

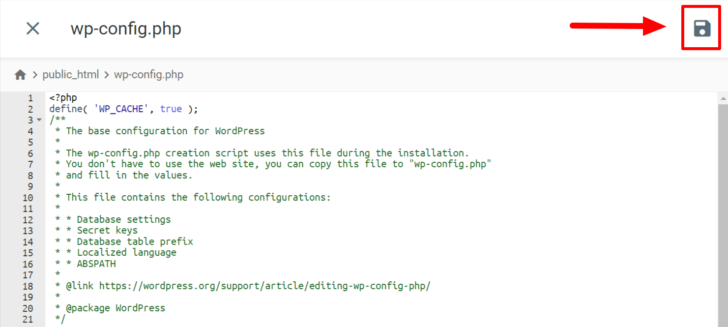
After saving the file, close it by clicking the “X” button at the top left of the page. Then, return to the hosting control panel, which should be open in the next tab. Click the “Admin Panel” button to access the WordPress control panel.


After modifying the wp-config.php file, navigate within the WordPress dashboard to the “Tools” -> “Network Installation” option. WordPress will prompt you to deactivate all plugins before moving forward. Ensure you do this before proceeding and revisit this section on the dashboard.

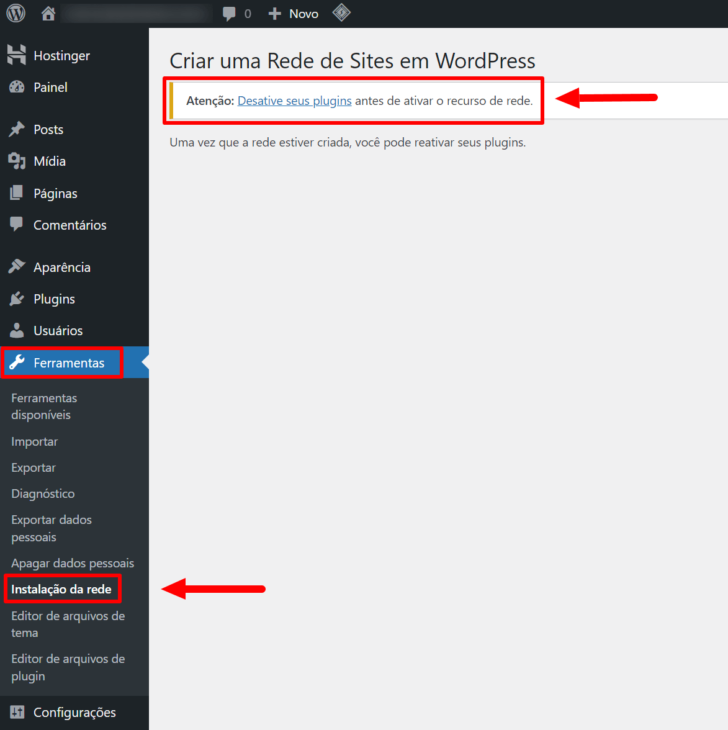
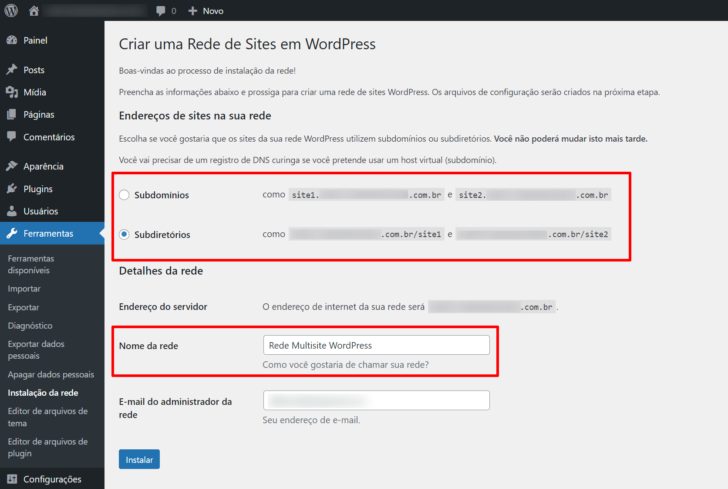
When accessing the network setup again, you will see the Multisite choices on the screen. It is crucial to select whether to set up the network of sites as subdomains or subdirectories.
If subdomains are utilized, the websites’ addresses will appear in the format website1.example.com, site2.example.com, and so forth. Additional DNS configurations will be necessary to map each subdomain within the domain’s DNS zone.
Using subdirectories is a straightforward method that does not need extra setup apart from linking to the main domain. Site addresses in this approach will follow the format example.com/site1, example.com/site2, and so on.
In this tutorial, I chose the second alternative.
It is important to provide the network of websites’ name and an email for administration on the same screen.
Click the “Install” button after finishing all tasks.

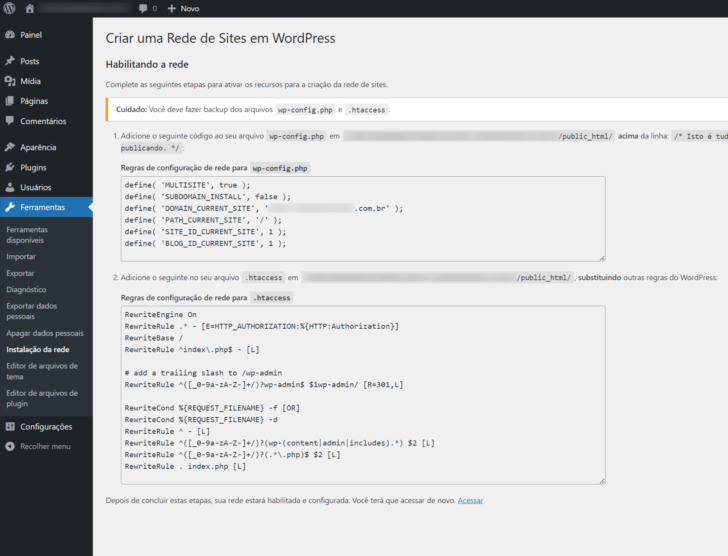
The last step involves adding additional code snippets to the wp-config.php and .htaccess files, both of which are server configuration files. Let’s proceed.
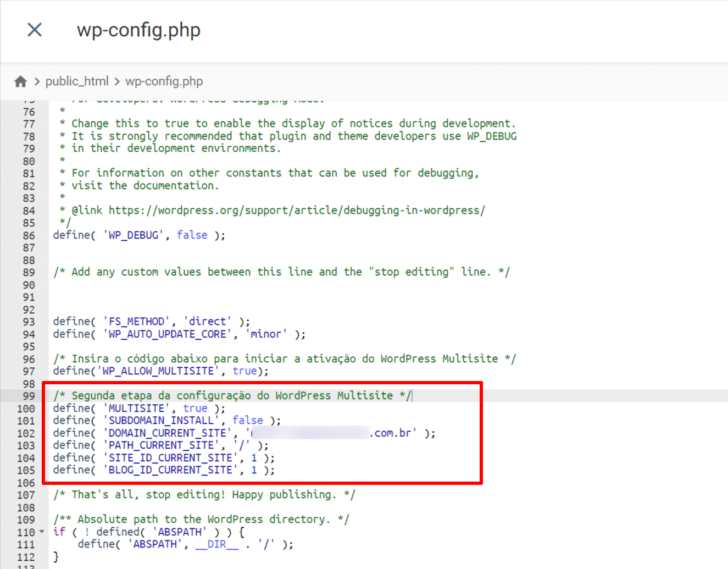
Open the wp-config.php file once more and insert the required code snippet directly following the previous snippet. Simply copy and paste the code supplied by WordPress.
Follow these steps attentively, as any mistake in typing could result in your website going offline.

After inputting the code, the wp-config.php file will appear like the provided example.

Save the changes and go back to the hosting file manager. Next, open the .htaccess file.

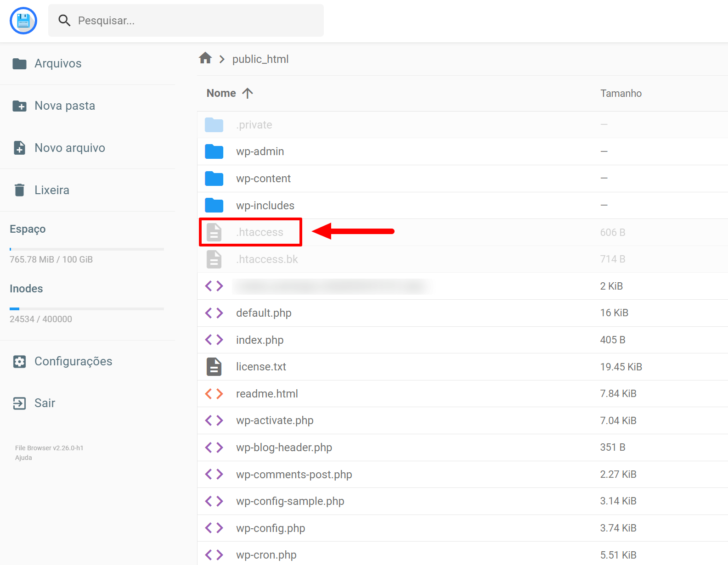
Insert the code snippet provided in the WordPress dashboard into the .htaccess file. The outcome should resemble this.

chsyys/iStock
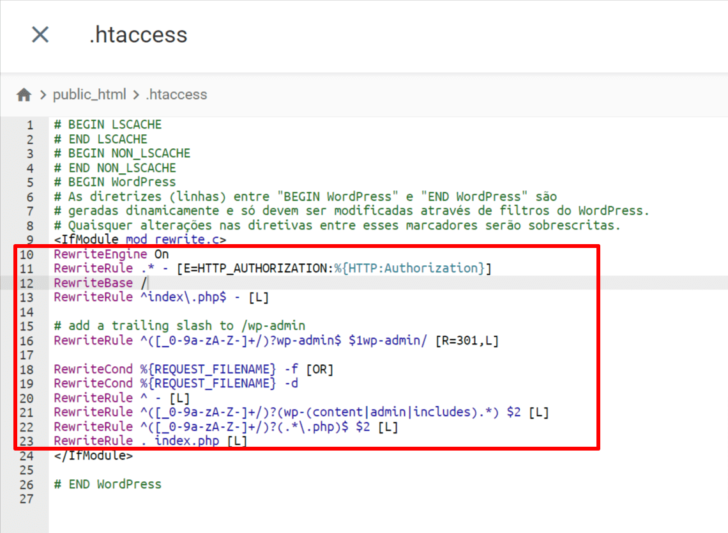
All code within the
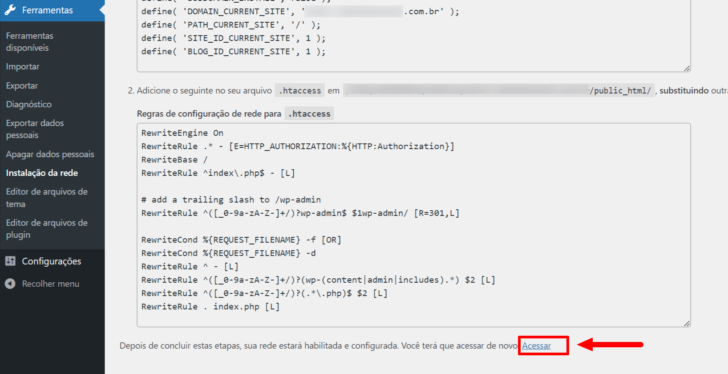
After verifying that all is in order, save the document and go back to the WordPress dashboard. At the bottom of the setup page, you will see a prompt for a new login. Simply click on the “Access” link as shown in the image.

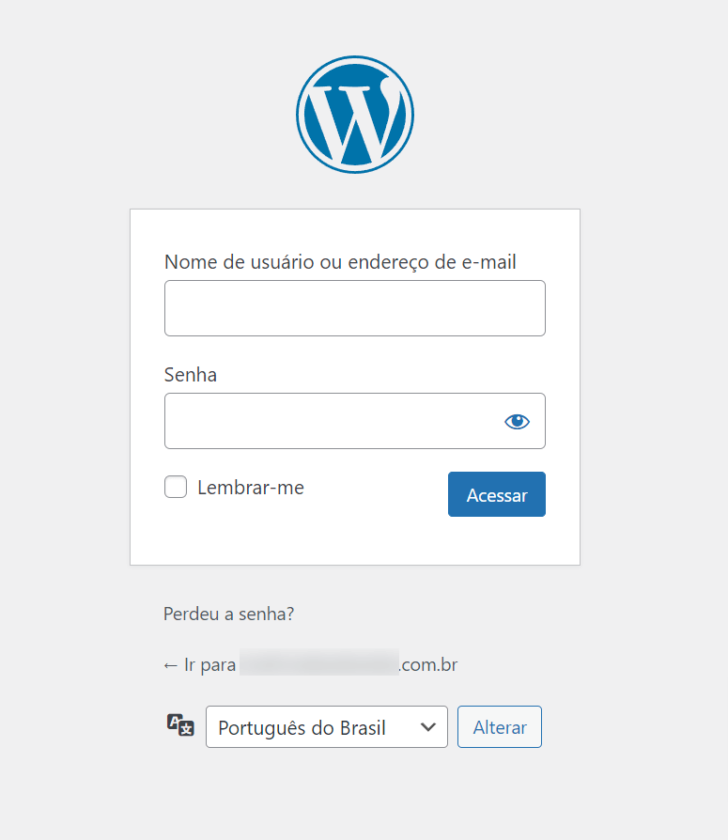
You will be guided to the WordPress login page where you can log in using the credentials you set up during the installation process to access your WordPress Multisite network.

The appearance of the “My Sites” section in the menu confirms that Multisite activation was successful.

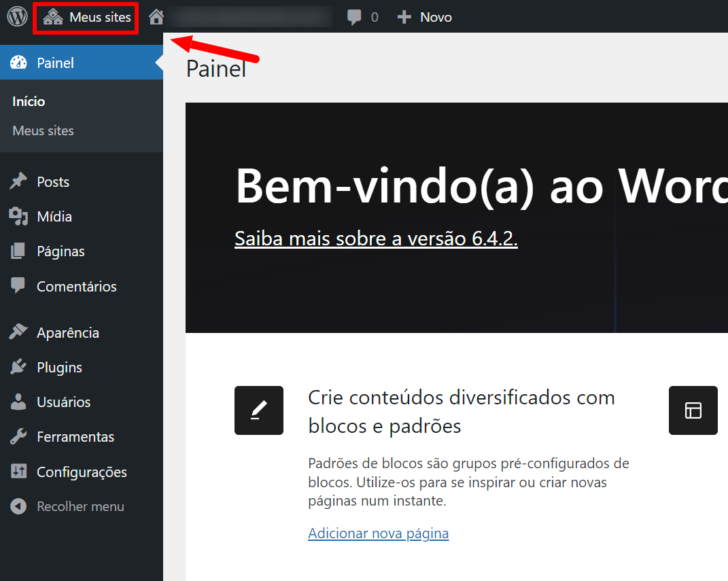
You can now begin to create and oversee more websites using the admin panel. Multisite provides new management features for controlling your network and individual sites.
After setting up Multisite WordPress, the next steps to take.
After setting up WordPress Multisite, there are various tasks you can carry out to oversee your network of sites.
In Multisite mode, site management involves a central panel accessible only to the administrator who set up the network, with the option to add other users for network or specific site management.
The site network panel has a more compact menu compared to the standard WordPress interface. This condensed menu allows administrators to oversee various aspects of the site network.
- Develop fresh websites.
- Add individuals to websites and establish their access permissions.
- Adjust network configurations.
- Install and enable plugins and themes network-wide.
- Update management;
- Customize specific website preferences.

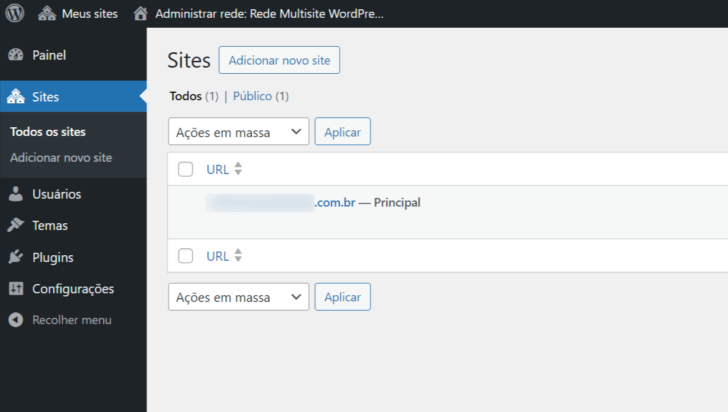
Below are some of the key functions of website management on WordPress Multisite, with additional details provided.
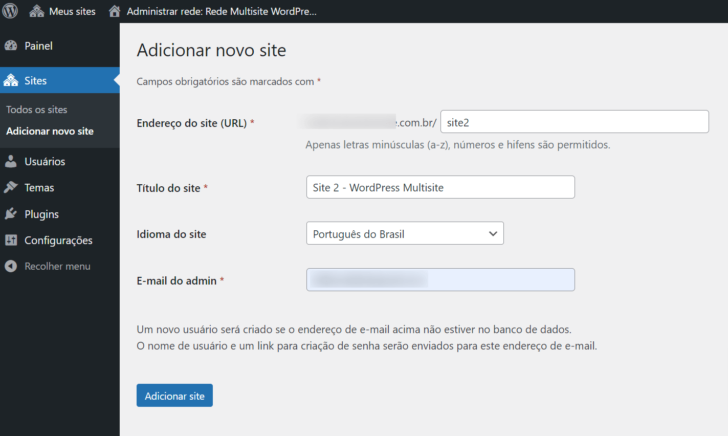
Multisite enables you to create and oversee multiple websites using a single WordPress setup. Access “My Sites” in the admin panel, then select “Create a New Site” to provide essential details like title, address, and site administration.

Users can be added to websites to assign them specific roles on each site, facilitating efficient collaboration and website management. Simply navigate to “Users” -> “All Users” to add users as required.
You can customize the general settings of your network in the admin panel under “Network Settings”, which allows you to adjust options such as site records, file upload, and email settings.
You can install and enable plugins and themes network-wide to ensure visual consistency or offer specific features on all websites.
Multisite simplifies update management, enabling you to update plugins, themes, and the WordPress installation across all sites simultaneously. Access the “Updates” section under “My Sites” to handle updates.
Customize specific site settings for each site on the network by accessing “My Sites” -> “Sites” and selecting the desired site for management. This enables unique configurations for each site.
In closing
WordPress provides an efficient tool for establishing a network of interconnected websites, simplifying the management process by enabling centralized control over tasks like theme and plugin installation and updates.
For additional information about the functioning of the WordPress Multisite network, refer to the official WordPress documentation.
If you want to get WordPress hosting for building your network of websites, take a look at our list of the top WordPress hosting services.
Publication date: January 18, 2024, with an update on January 19, 2024.
Tags related to WordPress include Tools and Tutorials.

